The barcode style determines, the settings of barcodes you insert after this style.

To insert the barcode, you should use the barcode element. The properties of the barcode style are these:
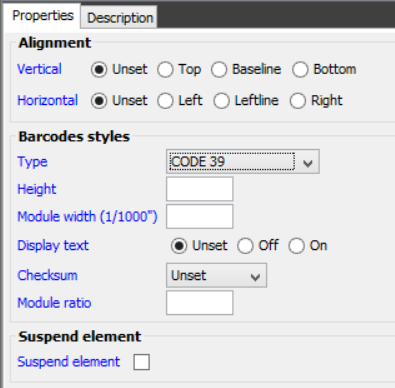
Alignment
How the barcode will be positioned relative to reference point. You should avoid using ‘Bottom’ unless necessary as this is not supported for rotation 90,180 and 270 for ZPL output.
Barcode styles
Type
The type of barcode e.g. Code39, Code128 etc.. The displayed selection of the remaining options will depend on what you select here.
Height
The height of the barcode in the measurement you have chosen via ‘Setup’ and ‘Measure’.
The size of the smallest bar/unit in the barcode. This is measured in 1/1000 parts of an inch, so that a width of 1000 equals 1 inch. InterFormNG will select a width that is as close as possible to this value - rounded up to the nearest number of whole dots. The width of a dot depends on the printer resolution (and for PDF the printer style setting). Here are the widths of a dot in some resolutions:
1 dot in 203 dpi is (1/203) = 0.0049 inch wide
1 dot in 300 dpi is (1/300) = 0.0033 inch wide
1 dot in 600 dpi is (1/600) = 0.0017 inch wide
So the width of a barcode may vary depending on the select module width and the printer resolution setup in output configuration (in the web interface). Some ‘golden’ module widths should be considered, if you want the barcode size to be as close as possible for 203,300 and 600 dpi. These ‘golden’ values are: 4, 9,12,13,19,22,23. If you want to see a barcode size close to the actual output, it is a very good idea to select the same resolution in a print style.
Display text
Activate this, if you want the text in the barcode to be written as human readable text below the barcode.
Checksum
With this you can chose to add a checksum to the barcode. The possible values are:
Add
Add a checksum to the data in the barcode.
Unset
Keep the previous value. As default a checksum will not be added.
Check
Tests the checksum of the input data. Invalid checksum results in an error.
Ignore
The checksum is not tested and is not added unless it is included in the input data. This is the default.
Module ratio
The module ratio is the ratio between the wide and narrow lines in the barcode.
A value of e.g. 2,5 will make the wide lines 2,5 times as wide as the narrow lines. The ratio will be rounded down to fit a whole number of dots in the specific printer resolution (as specified in the output configuration).
For the preview and result window the size of the barcodes are mainly defined by the settings in the barcode style, but is also affected by the printer resolution set in the print style, so it is recommended to set the print style to the actual resolution you want to use for printing.
Code128 Codesets
For the Code128 barcode, you have this specific option:
Codesets
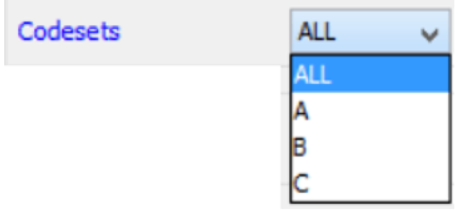
With the default value of ALL, any code set may be used by InterFormNG to encode the input text. This is recommended, as the barcode will be as small (and efficient) as possible. Alternatively you can select a specific codeset instead. Refer to this link for information of the code128 code sets: https://en.wikipedia.org/wiki/Code_128
For the 2D barcodes (Datamatrix, PDF417 and QR) a few extra fields appear on the barcode style:
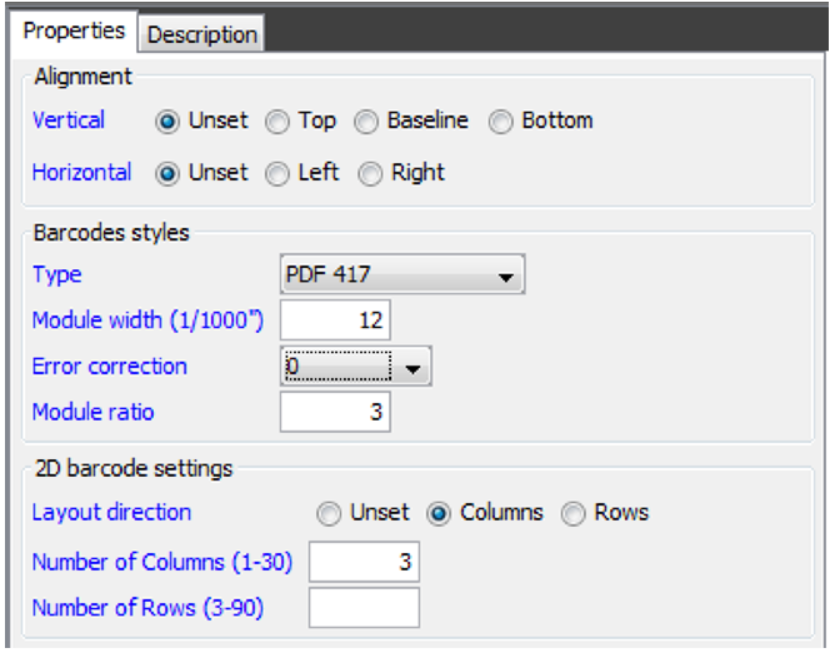
Error correction
This sets the error correction for the barcode. The Error correction for a PDF417 barcode can be set as a value between 0 and 8. The larger the value the larger the barcode will be - and easier to scan. The Error correction for QR can be L, M, Q or H (listed after size). Higher error correction creates a larger barcode or leaves space for less data with a fixed version.
Layout direction
The layout direction can be set for the PDF417 barcode. This sets in which direction the barcode will ‘grow’ - or rather a maximum height or width.
The number of columns is blocks of modules in the horizontal direction, and rows is the number of modules used for the height.
Columns (default)
Sets a fixed (or rather maximum) width.
Rows
Sets a fixed (or rather maximum) height.
The selected layout direction decides, if the specified number of columns or rows will be used (the other will be ignored).
Version
Specifically for the QR barcode the version can also be specified. The version defines a fixed size of the QR barcode. If left blank, then InterFormNG will always create the smallest possible QR barcode for the specific input data. If you set a specific version, then the supported data (in the barcode) will be limited to what the specific size supports. More information about the version can be found here:
http://www.qrcode.com/en/about/version.html
Encoding
You can set the encoding of QR barcodes. The encoding must fit the settings of your barcode scanner.