If you have purchased the Nextway Next module for InterFormNG2 and configured the integration, then you can use the advanced output workflow component, To Next Archive to archive the payload of a workflow in the Nextway Next archive solution.
Note that to be able to upload documents to Next with this component, you also need a Nextway Next license for "Document capture with REST service" (Contact Nextway for additional information). This component also requires Nextway Next version 1.8.0.83 or higher.
Before you can use the To Next Archive workflow component, you first need to configure InterFormNG2 for archiving via the tenant settings.
Necessary configuration in Nextway next
However, you first need to create an API access key in the Next administration module:
1.Log in to Next as an administrator.
2.Open the administration module and go to User management configuration → API access.
3.Click the "Add" button and then specify a name and description for the key. Optionally add a user as "on behalf of". If you do not specify this here, then you need to specify it in the InterFormNG2 configuration.
4.Click the "Save" button to create a new key. Copy the contents of the "Key" field, you will need this in the InterFormNG2 configuration below for the API access key.
5.Go to the restrictions tab and add the following to "Available APIs": authenticate, add, list, id, content. Then click the "Update" button.
For more information about API keys, see: https://dist-multi-support-com.s3-external-3.amazonaws.com/latest/documentation/Multi-Support%20Next/index.htm?ms-n_api-sign-on.htm
InterFormNG2 configuration
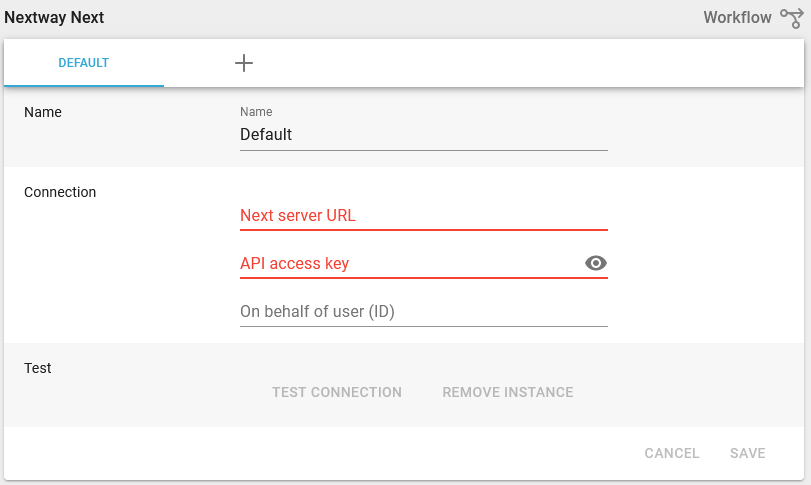
In the InterFormNG2 tenant settings under Workflow and Nextway Next you see this configuration screen:

You can define multiple Next archive configurations, if you click the '+' icon on the top.
The configuration has these parameters:
Name
This must be a unique name in InterFormNG2. The default name is Default, but you can freely change that. The name is referenced in the To Next Archive workflow component as the Nextway instance.
The connection setup has these parameters:
Next server URL
Specify the URL of the Next server that you want to connect to. On a default local installation this will be http://localhost:8080
Specify the key that was created in Next API access, as described above.
On behalf of user (ID)
The is optional. Here can specify the user that you want to act as. This should only be specified, if you did not specify it on the API key configuration in Next as covered above. So you should NOT specify the user ID in both NEXT and here in the InterFormNG2 configuration.