Conditional Element

Use this element to insert another overlay if a condition is true. The other overlay can ‘receive’ spooled file lines from where the Mark the area for the condition in the input view: Mark out the line interval while holding down the left mouse key and mark out the position interval for the condition while holding down the right mouse key. Properties of this element are:
Examples of how to use the conditioned overlays are included in the section: Work with conditioned overlays.
You see these icons next to the conditioned sub-overlay:
Insert an existing overlay as the overlay to call for this condition:

Clear the reference to the suboverlay - does not delete the actual sub-overlay:

Creates a new sub-overlay to be called:

When you have selected a conditioned overlay, you can edit it by pressing this icon:

When remapping spooled file contents in a conditioned overlay you should use the 'Conditional view' instead of 'Input view'. When finished editing this return to the main overlay by selecting ‘File’ and ‘Close current overlay’ - or by pressing this icon in the toolbar:

The options are:
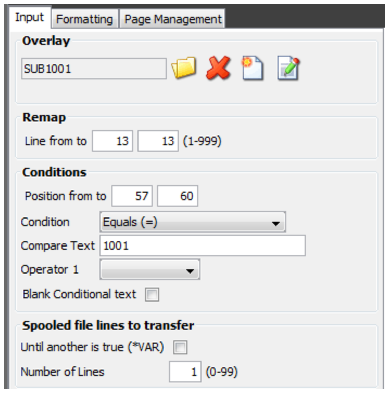
Remap
The line interval to scan for the condition.
Condition
Refer to the tabulator for details. If you select ‘or’ or ‘and’ for operator 1, then you can combine multiple conditions (up to 4) for the same spooled file line. You can e.g. do like to so include the conditioned overlay for numbers that are larger than 1001 and lower than 1004:
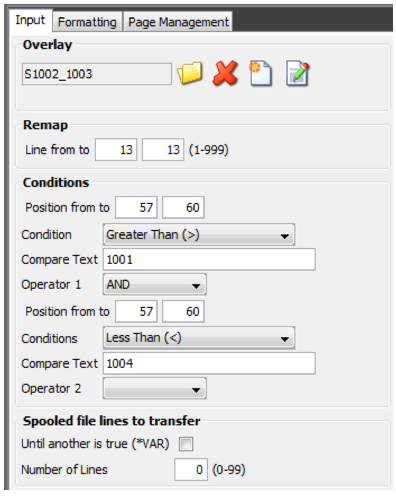
You can use 3 operators to include up to 4 conditions for a single element.
Blank conditional text
If activated the characters used for the condition will be blanked out - when the condition is true. The characters are still available in the conditioned overlay if any lines are transferred.
Note the ‘Spooled file lines to transfer’ in the bottom. ‘Until another is true (*VAR)’ is default disabled and the number of spooled files lines transferred to the conditioned overlay is 0.
If you specify a number, then that is the number of spooled file lines, that are transferred to the other overlay, starting from the line where the condition was true.
If ‘Until another is true (*VAR)’ is enabled, then all spooled file lines from the line with the true condition are transferred to the sub-overlay - until another (or this) conditioned element is true.
Formatting tab
Notice the ‘Formatting’ tab. With this you can decide where the conditioned overlay should be placed:

Vertical reposition
The vertical reposition can move this overlay and the subsequent spooled file lines up or down:
Actual position:
This will move the rest of the spooled file up (negative value) or down (positive value).
Last non blank input line:
Use this repositioning e.g. in order to close the gap of blank lines on the original spooled file. (Place the suboverlay relatively to the last non blank line.)
Reposition after execute of suboverlay:
The main benefit from this option is that if you are using an extended remap window in the suboverlay, then you can make the height of the suboverlay adaptive - to fit the text remapped lowest on the page, but this option can be used whenever the height of the suboverlay is uncertain.
The vertical and horizontal placement decides if the overlay should be placed in a fixed position (absolute) or relative (+/-) to where the condition is true.
With a vertical displacement of ‘+’ you can push the suboverlay downwards and with ‘-‘ the suboverlay is moved upwards relatively to the line(s) where the condition is true.
You should always have the vertical or the horizontal position (or both) set to Absolute(A), if both are relative (+ or -) then you will see a wrong result in PDF - if you are not using the new behaviour option.
With the New behaviour option the vertical and horizontal placement always refer to the default (global) position of the referenced texts. Here you can also reuse the same conditioned overlay in various positions by repositioning it in the main overlay.
An example showing how to use the conditional element is found below.
Rotation of conditioned overlays:
The rotation of a conditioned overlay depends on, if you are using the New behaviour option on the main overlay:
New behaviour enabled: The rotation of a conditioned overlay can be seen as a relative rotation - the rotation of the conditioned overlay is added to the rotation of the main overlay.
New behaviour disabled: The rotation of the conditioned overlay is ignored and only the rotation of the main overlay is used.
Rotation
Sets the (additional) rotation of the conditioned overlay - available for new behaviour only. This sets the rotation (anti clockwise) of the conditioned overlay - relative to the main overlay.
The manual also includes an example showing how to use conditioned overlays.
Tip: You can select an element in a conditoned overlay or unconditioned suboverlay in the result view (even if this sub overlay is not open for edit), if you hold down the left <CTRL> while clicking on the element in the element list.
TIP: It is not possible to use more than a single level of conditioned overlays, i.e. you cannot call a conditioned overlay within another conditioned overlay. If you want to combine conditions you can e.g. use the option to combine up to 4 conditions for a conditioned overlay, use conditions on remaps/tabulators and/or use an overlay selector.
You can select an element in the element list (that has been inserted via either a conditioned or unconditioned sub-overlay) by pressing the <Ctrl> key while clicking the element in the result view.