Tabulator

A "tabulator" performs formatting and horizontal movement of an interval of lines and positions in the spooled file. A related element is the Remap Window. You should use the tabulator if you want to delete some spooled file text: Just tabulate the text and place it outside the page in the result view. Mark first the area of text on the input view, that you want to tabulate and then mark the place in the result view where it should be printed.
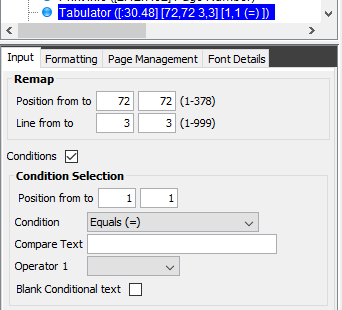
Under the Input tab you will find this:

Position
The positions in the spooled file to tabulate.
Line
The lines in the spooled file to tabulate.
Refer to this section for an explanation to why, if the lines and or positions of a tabulator or remap window cannot be changed with the mouse.
Conditions
If you activate this, then each spooled file line in the marked line interval is tested according to the condition and only lines fitting the condition are tabulated.
Position
The positions of each line to be used for the comparison.
Condition
(Comparing the selected positions with the compare text below). Possible conditions are:
> Greater than a number entered in the following field. Comparison is text/char based.
= Equal to a text string (case sensitive)
< Less than a text entered in the following field. Comparison is text/char based.
N Not equal to a text string (case sensitive) or a number.
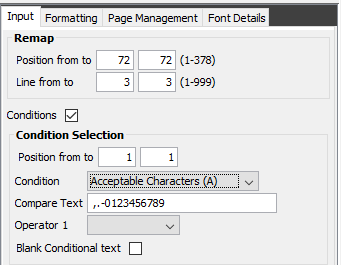
A Acceptable characters. All the characters must be one of the characters in the compare text below.
U Unacceptable characters. Opposite to A-Acceptable characters i.e. one or more of characters are not found in the list in the compare text.
Compare text
The text with which the spooled file contents is compared to.
Blank Conditional text
If activated the positions used for the condition are removed from the spooled file i.e. they are not printed. Any trailing blanks are trimmed off, so insert blanks e.g. a the first char if you need to use blanks/spaces for the A and U comparisons. You should consider to remove the conditional text in a different way e.g. via another tabulator element.
Example using condition A=Acceptable characters
If you want the tabulator only to work for lines, that contains a number, then you can use this condition:

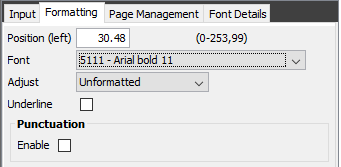
Under the formatting tab you define the position and layout of the tabulated text:

Position
The position in the output from the left edge of the paper - or reference position for other adjustments.
Font
The font to use for the tabulated text.
Adjust
The adjustment of each line. Possible values are:
Unformatted
The area is printed without any changes to formatting, and spaces.
Left
Leading spaces in each text lines are removed, causing each line to be left adjusted at the position indicated above.
Center
Trailing and leading spaces within the tabulator area are first removed, then each line are centred.
Right
Trailing spaces are removed, and then each are right adjusted at the position indicated above.
Numeric
Right adjust for numeric values. The values are still nicely right aligned even if some should be negative (with a minus as the last character).
Barcode
Print succeeding spaces in barcode data. Indicates if the spaces in the coloumn interval succeeding the barcode data should be converted to barcode. This only apply to the barcodes 128 and 3of9. The barcodes will always be left-adjusted. (Normally succeeding spaces will be ignored.)
WARNING: Adjustment cannot place the adjusted text to the left of the left edge of the paper in PCL output (negative positioning is not possible). So if you try to e.g. right adjust a long text, that cannot fit in between the left edge of the paper and the specified position, the text is moved to the right to make room for all the text.
Underline
Underlining of text in the tabulator (leading and trailing blanks are not underlined).
Punctuation and Punctuation Length
If the last position of a tabulated line is a period sign, a line of punctuation will be printed. The punctuation will start after the last printable character, and continue to the Punctuation length. Only Adjustment values Unformatted and Left can be combined with the punctuation. No punctuation will be made if other values are used, if no period sign is found or if the text exceeds the punctuation length.
If you are unable to mark a new area in the input view, when trying to change the tabulator: Please refer to the ‘Lock spooled file selection’ section for help.
WARNING: If two or more overlapping tabulators are defined the first defined will take the text it needs and leave blank positions in the relevant place for the next tabulator. A maximum of 200 tabulators per overlay can be defined. The limit of 200 includes any referenced suboverlays. If you are using many conditioned tabulators you should consider to use the conditioned overlay instead.
WARNING: Adjustment cannot place the adjusted text to the left of the left edge of the paper in PCL output (negative positioning is not possible). So if you try to e.g. right adjust a long text, that cannot fit in between the left edge of the paper and the specified position the text is moved to the right to make room for all the text.