If you want (or need) to manually upload fonts to your ZPL compatible printers, then you should consider the advanced, output workflow component, Create an upload font ZPL.
This feature can be considered in these scenarios:
Scenario 1: Decrease the size of the ZPL print data stream
Normally it is not an issue, that the soft fonts (.ttf) are uploaded each time as a part of the print out - although the soft fonts makes the print data stream slightly larger. If you have an extremely slow or bad connection to the printer, then you can actually reduce the size of the ZPL print outs by uploading a few fonts into the flash memory of the printer with the workflow component, Create an upload font ZPL and then register that in the InterFormNG2 ZPL printer configuration, Font mapping.
Scenario 2: Printer does not support font upload in the middle of the ZPL print data stream
This can be used, if the ZPL printer does not support upload of fonts in the middle of a ZPL print data stream or if you want to exclude font upload in the normal print outs to reduce the size of the ZPL print data stream to an absolute minimum. The downside is however, that you will need to upload the font(s) to a new printer, if the existing printer is replaced. This is linked with the option, No font upload on the advanced ZPL configuration on the printer.
The workflow component has these parameters:
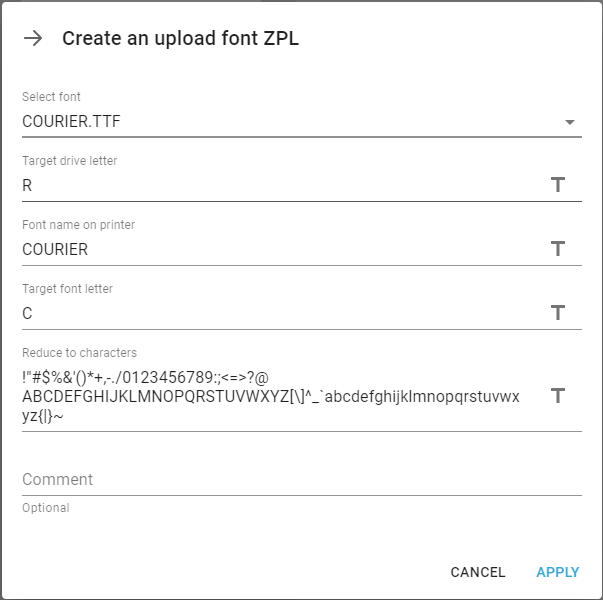
Select font
The installed TTF font, that you want to upload to the ZPL compatible printer. Here you need to specify the name of the font file e.g. arial.ttf.
The target drive on the printer where the font is to be stored. Here you should specify the flash drive of the printer. If you have doubts as to which drive letter to use, then you should consider to type in the IP-address of the printer in a browser and then you will see this:
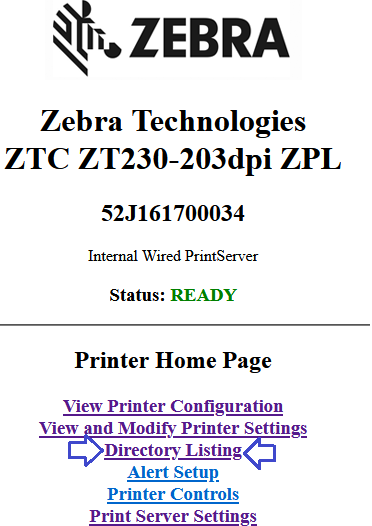
Here you click the Directory Listing as marked above and then you can see the files stored on the printer:
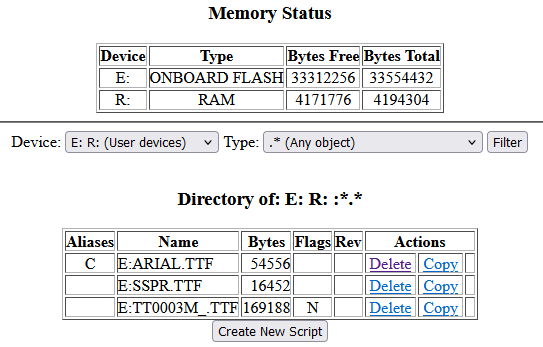
Here we can see, that the flash drive is E:, so in this case we should specify E as the target drive letter. We can also see, that there are about 33.5Mb available on the flash drive where we have already uploaded the arial.ttf font and that the arial.ttf font is associated with the target font letter C as referenced below. We can also see, that the arial.ttf font has been reduced to only 54556 bytes from the usual 900Kb.
Font name on printer
The name (description) of the font.
This is the letter, which on the printer is linked to the font. Supported letters are: "CIJKLMNOWXYZ123456789". The setting here must match the font mapping setup on the advanced ZPL settings of the printer.
Reduce to characters
If you leave this option blank, then the full font will be downloaded to the printer. It might however be a good idea to limit the font to only the characters, that you intend to use on the printer as the printer has a limited memory. You can do that with this option where you simply list the only characters, that you need in the font. To help you this default string is added here:
!"#$%&'()*+,-./0123456789:;<=>?@ ABCDEFGHIJKLMNOPQRSTUVWXYZ[\]^_`abcdefghijklmnopqrstuvwxyz{|}~
Please notice, that this default list might not be sufficient for your installation. If you e.g. are a german you would also need to add the characters: äöüßÄÖÜẞ and a dane/norwegian would need to add: æøåÆØÅ.
If you have reduced the font too much and are later trying to print characters not included in the uploaded soft font, then the missing characters are still printed - but in the standard Triumvirate font of the Zebra printer.
How to Create an upload font ZPL
In order to actually upload the font to the printer you need to combine this workflow component with other components so that the ZPL print data stream generated is actually sent to the printer.
An example of such a workflow is included below:

The other workflow components are:
This selects the printer to which the font is to be sent.
Sets the resolution of the printer. It is really not needed here, but I added it to avoid a warning when printing.
Sends the ZPL print data stream to the printer, that was previously selected with the Set printer component.
After you have uploaded the font you can verify, that the font is actually saved to the printer via the printer directory as described in the section, Target drive letter above. Now you can move on to change the advanced ZPL settings for the ZPL printers, that should use this uploaded font.