When you setup a ZPL compatible label printer in InterFormNG2, then you can setup these advanced ZPL settings:
The options are covered below:
Preview printer
If you enable this, then the printer can be used for previewing the merged result as ZPL in the designer.
Start with fonts
Tells InterFormNG to include any soft font in the start of the print data stream. That is required on some Datamax printers.
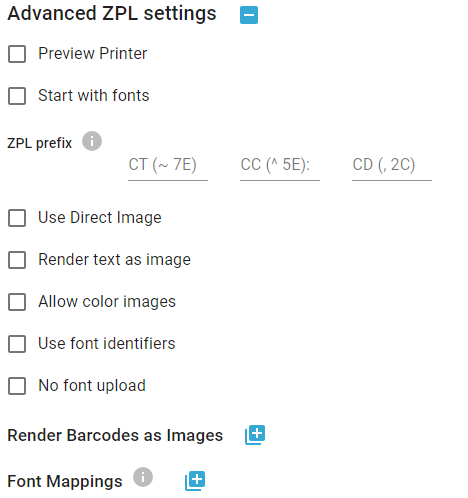
ZPL Prefix
Special prefixes used in the ZPL print data stream. The values here must fit exactly with the values configured on the printer. You can verify that if you check with the printer configuration on the physical printer e.g. via a browser.
Zebra changed the firmware of the ZPL compatible printers to a new ZPL variant over 15 years ago. The ZPL output, that is generated by InterFormNG2 is the new format in which e.g. soft fonts are handled in a different manner. This means, that only printers with firmware xx.14.xx or higher supports the ZPL print data stream, that is generated by InterFormNG2.
If this is a problem, then you these options:
1.You can consider either to upgrade the firmware of the printer or to consider Driver print as the mime type instead of ZPL on the InterFormNG2. Driver print is only an option if InterFormNG2 is running on the Windows platform.
2.You can also choose to simplify the ZPL print data stream generated by InterFormNG2 with the many options mentioned below:
(The options below can also be set dynamically in the workflow via predefined variables.)
Use direct image
If selected all images are sent as direct pixelmaps instead of a PNG upload. This can be useful if the printer is unable to handle upload of png images. Potentially this can also potentially improve the performance of the printer if the connection is fast: The print data stream will become larger, but the images are easier/faster to process in the printer. If you are always printing a single label at a time, then you should consider to enable this option.
Render text as image
If selected the texts in the ZPL data stream are renders as images. This can be used as a workaround on printers, that e.g. does not support the encoding used.
Allow color images
If selected images are uploaded to the printer as color images instead of black and white. Some Epson printers supports printing of color images. (PLEASE NOTE THAT THIS IS UNTESTED, SINCE WE DON’T HAVE AN EPSON PRINTER WITH COLOR SUPPORT).
If selected then font mapping (letter as reference) is used instead of the TTF name of the font. This might increase printing speed. If used with “No font upload”, then preinstalled fonts on the printer are used - missing mappings of a font will cause a warning and a default mapping to font 0 (zero).
This option is linked with the option, Use font identifiers above. If No font upload is enabled, then the option, Use font identifiers above should also be enabled. If you have enabled the No font upload option and not enabled Use font identifiers, then you will see the warning: "No font upload is enable and use font identifiers is disabled". In order to remove this warning you should also enable the option, Use font identifiers.
If the printer cannot handle soft fonts in the print data stream or if you want to reduce the ZPL output to an absolute minimum, then you can manually upload the soft fonts to the printer, setup a font mapping (as covered below) and then enable this option. The downside is, that you need manually to upload all the used soft fonts to the printers memory and maintain the font mapping with the workflow component, Create an upload font ZPL.
Render barcodes as images
If the printer does not support all barcodes or if e.g. the specifications of a barcode is not supported by the printer, then you can enable this option for the barcode of your choice. If you click the + icon you can enable/disable this for each barcode type.
In order to use the font mappings the No font upload option and the Use font identifiers option above must be enabled.
If you upload the soft fonts manually to the printer (with the workflow component, Create an upload font ZPL) , then you here need to match the used fonts with the letter, that you have used when the font was uploaded to the printer. You can click the + icon to add mappings:

The font name is found via a drop down list.
You can also use the font mappings to make the printer use one of the internal, predefined fonts instead of the soft font, that is used in InterFormNG2. You can use this to reduce the size of the print data stream, that is sent to the printer. The Zebra printers has predefined fonts with the letters: A, B, D, E, F, G, H, O, GS, P, Q, R, S, T, U, V. (You can see the fonts if you search the ZPL II manual for "Standard printer fonts").
Use the built in Triumvirate font of the printer
The predefined fonts are all fixed in size - except font O, which is a scalable Triumvirate font, so if you are happy with that font, then you can map the used soft font to O like below:
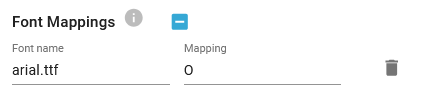
You should write the font name exactly as the font file, that is installed in InterFormNG2. You should also consider which versions of the font, that you are using: You might need to upload the normal font, the bold, then italic and perhaps even bold+italic.
Tip regarding mobile printers
Customers with Zebras: Link OS Mobile printers including the iMZ Series, ZQ500 Series and QLn Series should consider the special predefined variable, interformng.zpl.includeLabelWidth to cover the label length requirement as stated here.
Example: How to reduce the ZPL print data stream by referring to uploaded fonts
For a normal installation this example should not be considered. This should only be considered if it is very important to reduce the ZPL print data stream to an absolute minimum. A large part of the ZPL print data stream is normally the soft fonts (apart from images) and it is possible to remove font uploads in the print data stream by uploading the fonts to the printer first and then refer to them in the InterFormNG2 print data stream.
You should read the points below before moving on:
Disadvantages
•You need to upload every soft font, that you want to use to the printer. That includes all variations of the font e.g. if you want to use Arial, then you need to upload the arial.ttf font, but you also need to upload arialbd.ttf if you also want to be able use Arial bold - same for Arial italic and even Arial bold+italic.
•You need to register each uploaded font with the correct mapping letter for each printer.
•If you later create a print out, which refers to a font, which has not been uploaded to the printer, then the text will be written in the default font, Triumvirate (internal font 0).
•If you change to a new printer, then you will need to upload the required fonts to the new printer.
Step 1: Upload soft fonts to the printer
The first step is to upload all the soft fonts, that you intend to use on the printer into the flash memory of the printer. That includes all variations of the font, that you intend to use including the normal, bold, italic and bold+italic. You upload the fonts with the workflow component, Create an upload font ZPL. You can at any time verify the soft fonts stored in the printer via the Directory Listing. This is done with a workflow similar to this. You should note the matching sets of Target font letter and soft fonts as you need to register each matching set on the printer configuration as well.
Step 2: Register all matching Target font letters with font files
On the advanced ZPL settings on the printer you now add font mappings for each of the soft fonts used - with the matching Target font letter used on the Create an upload font ZPL component.
You can move on to activating the change as below when this has been done.
Step 3: Activating the use of uploaded soft fonts only
When the preparations above are done, then you can move on to activating references to uploaded fonts only on the advanced ZPL printer settings. You need to set these options to change the mode for the printer:
Enable this option:
Use font identifiers
Enable this option:
No font upload