If you have purchased the d.velop module for InterFormNG2, then you can output documents from InterFormNG2 into the d.velop application.
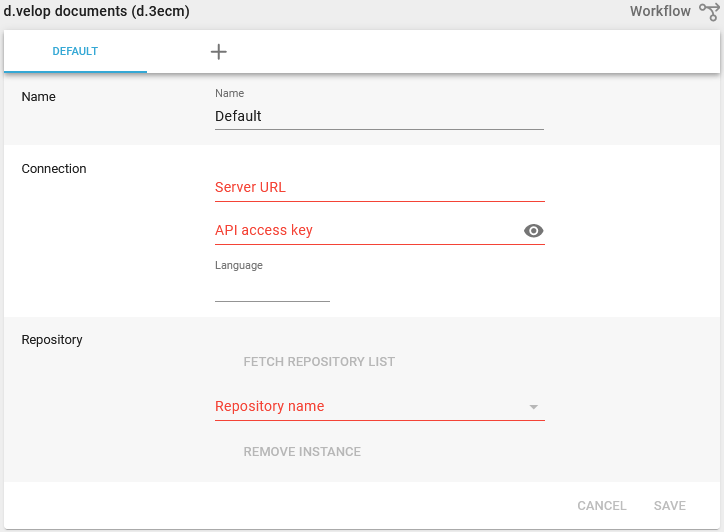
A prerequisite for that is, that you have configured a connection to your d.velop application like below:
In order to use the d.velop documents workflow component, some connection parameters have to be configured in tenant settings.
However, you first need to create an API access key in the d.velop documents configuration module.
From the dashboard, click on the "Configuration" widget.
From the configuration page, select "Login options".
On the toolbar, select the fingerprint icon "Manage API Keys".
On the toolbar, select the plus icon "Create API Key".
Select a user account and set a label for the API key, then click the "create" button.
Use the "copy to clipboard" button to copy the generated API key, so you can paste it into the InterFormNG settings.
In InterFormNG select "settings" from the top navigation bar and scroll down to the section "d.velop documents":

As name you specify a connection configuration, that you will later refer to in the workflow.
As "Server URL" specify the URL of the d.velop server that you want to connect to. If you are using the cloud version, then this will be something like: https://mycompany.d-velop.cloud
As "API access key" paste the key that was created in d.velop documents configuration, as described above.
Via the Language parameter you can define which database in d.velop, that you want to use.
Use the "Fetch repository list" button to both test the connections and also get a list of available repositories. If this succeeds, then the "repository name" drop-down will be populated with the names of all available repositories. Choose the one that you want to use.
If the connection fails due to an error in the URL, API key or something else, then an error message will be displayed instead.
To archive documents into d.velop you should use the To d.velop documents workflow component.