This section concerns E-mail servers (SMTP setup) for a tenant. A similar setup is available for system emails.
For a normal setup you need to configure at least one email server, before you can send emails in InterFormNG2. This is covered below.
In order to setup the email servers, you first need to sign in as described here.
Please check the section, Certificates regarding the limited support for certificates.
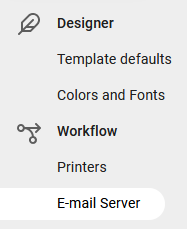
Then you click E-mail server on the left below Workflow:
Now you see a long list of options for the default email server:
(Only the top options are shown below)
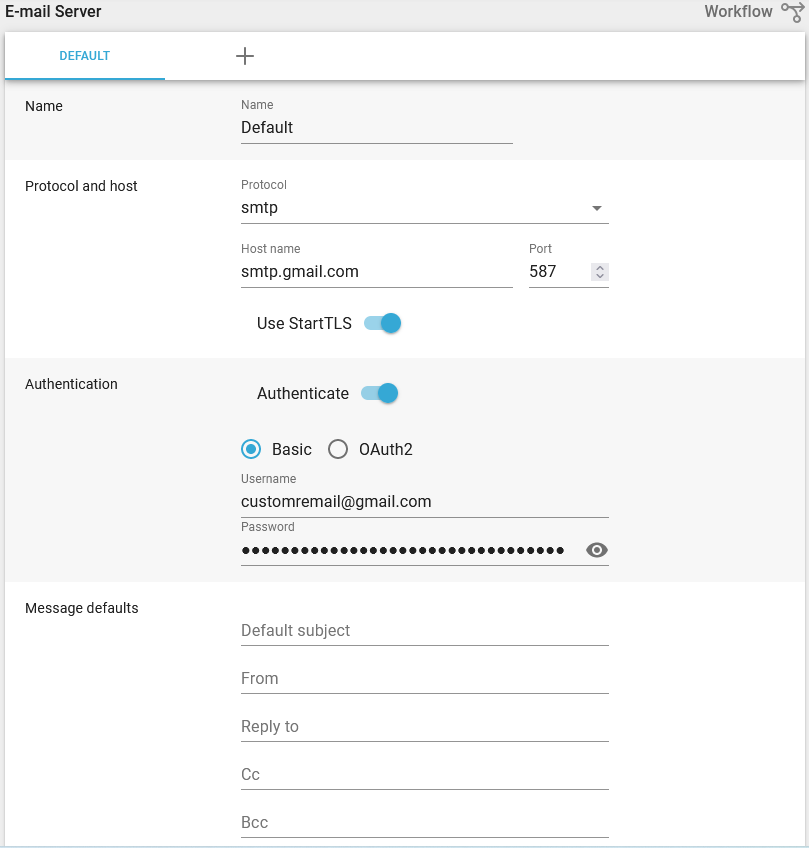
Each of the options are described below:
Top ribbon
In the top ribbon above you see two tabs: The first one is named DEFAULT and in the next tab you see a plus (+) icon. You can register multiple email server configurations and the names in the top ribbon are the email servers, that you have defined. If you click the plus (+) icon, then you can create an additional email server configuration. The procedure to delete an email server configuration is also included below. If you want to update an existing email server configuration you first click the tab in this ribbon and then the current settings are shown. You can then edit the settings and then save the changes with the save option in the bottom right corner of the configuration:

Name
This is the internal name of the email server configuration. You can refer to this in the workflow, when you want to email e.g. in the Create PDF email component. You do not need to use the name, DEFAULT. You can just replace this with another name if you want.
Protocol and host
The protocol (smtp or smtps) and email server as well as port number to use for communication with the mail server.
Authentication
If activated you need to state a user and password for the email server account to use. Here you can also change to the more secure (recommended) authentication, OAuth2 for secure emailing with Office365. The setup is covered in the sub-section, Office365 SMTP OAuth2 configuration below.
Message defaults
The defaults settings to use for the email, if they are not specified.
This require, that connections to remote clients are allowed in the global settings, and that at least one remote client as been setup for the current tenant.
If activated you will see this:

Select the remote client, that you want to use under output location.
The final option on the list is:
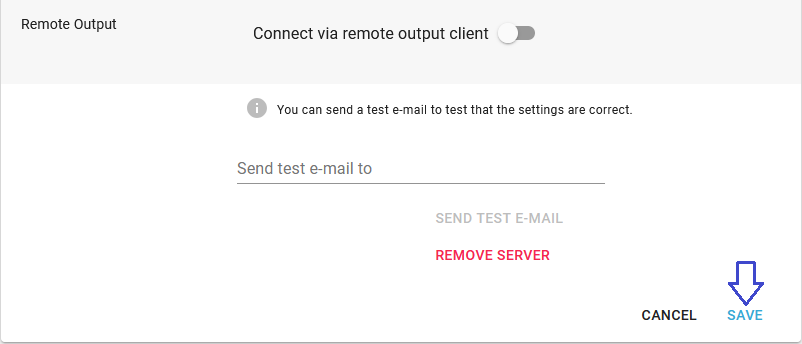
If you want to verify the e-mail configuration, you can enter a receiver email address here and click Send test email:

On the right you can see the option to delete/remove the e-mail server configuration from InterFormNG2.
Create an additional email server configuration
In the top ribbon of the email server setup you see this ribbon:

The ribbon contains a tab for each email server, that has been defined and also an extra tab with the plus (+) icon. The names shown in this ribbon match the names of the email servers, that you have registered in InterFormNG2.
If you want to add an extra email server, then you just click the plus (+) icon in this ribbon:

When you have clicked the icon a new empty tab is created and now you can enter the name and settings for the new email server:
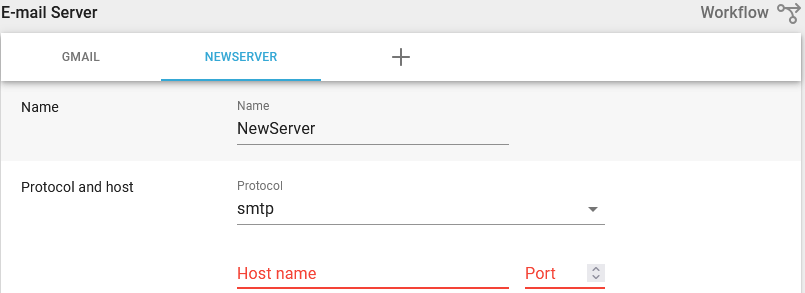
When you type in the name of the new server the name shown in the top ribbon is updated.
When you are done with the settings you can now save the new server with the save icon in the bottom right corner:
If you regret you can of course also delete an email server.
Delete an email server configuration
If you want to delete an email server configuration, then you need first select the email server in the top ribbon:
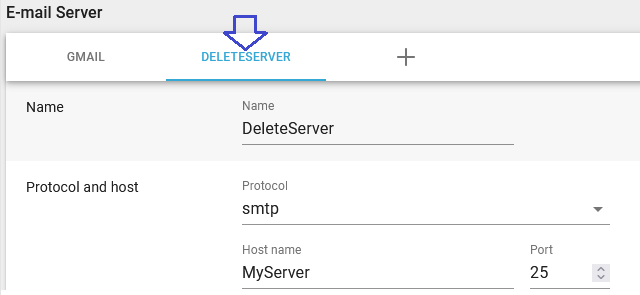
And then you scroll down to the bottom of the email server configuration:
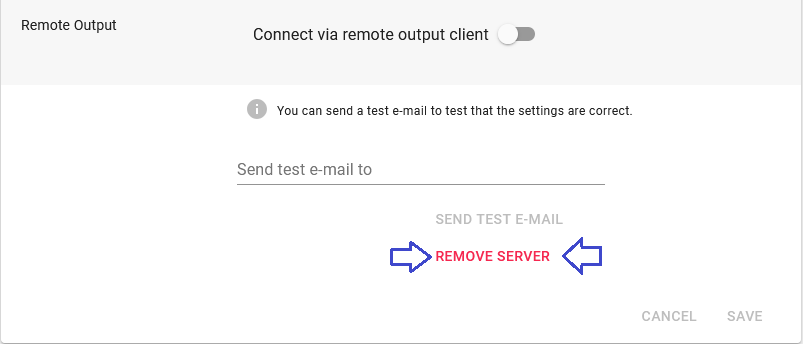
And then you click the REMOVE SERVER text as marked in the image above. Then you need to click the save icon in the bottom right to save this change:

Now the email server configuration has been deleted.
Office365 SMTP OAuth2 configuration
If you select OAuth2 for the authentication of your email server, then you will see these extra parameters on the email server setup:
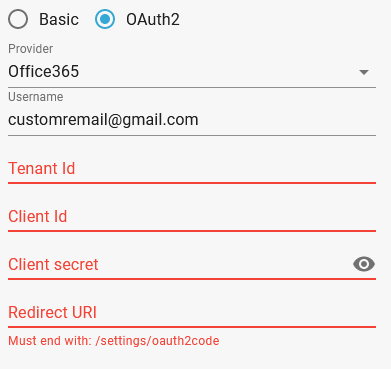
The following describes how to send an e-mail with Office365 SMTP and OAuth2 authentication.
This uses the authorization code flow described here: https://docs.microsoft.com/en-us/azure/active-directory/develop/v2-oauth2-auth-code-flow
The client credentials flow, which we use for SharePoint integration, would be more useful for our purposes, but unfortunately it seems to not be supported for SMTP use.
Azure Active Directory configuration
Some configuration needs to be done first on Azure Active Directory: https://aad.portal.azure.com/
Go to "Azure Active Directory" -> "App registrations" and create a new registration.
The result should look similar to this:

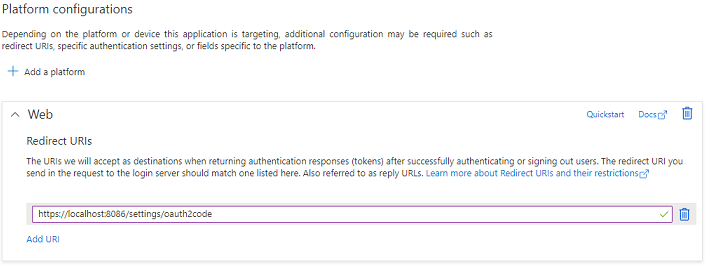
Then select "Authentication" -> "Add a platform" -> "Web". Specify a redirect URI for an InterFormNG2 URL that can handle the response, something like http://locahost:8086/settings/oauth2code
The result looks like this:
InterFormNG2 settings
On the InterFormNG2 settings page, we should ask the user to enter the tenant id, client id, client secret and redirect URI from the app registration. We then create a URL for the user to click on, with this format:
https://login.microsoftonline.com/<TENANT_ID>/oauth2/v2.0/authorize?client_id=<CLIENT_ID>&response_type=code&redirect_uri=http%3A%2F%2Flocalhost%3A8086%2Foffice365auth&response_mode=query&scope=openid%20offline_access%20https%3A%2F%2Foutlook.office.com%2FSMTP.Send&state=<RANDOM_NUMBER>
Where TENANT_ID and CLIENT_ID are from the app registration. RANDOM_NUMBER is a random number.
The user will be asked to log in to his Microsoft account, and is then redirected to the specified redirect_uri. The redirect URL contains a code parameter. We need to grab the code value and use it for the next step. Also for security, we should check that state has the same value as in the generated URL.
Generate token
Now a token needs to be generated by sending a web service request to https://login.microsoftonline.com/<TENANT_ID>/oauth2/v2.0/token. This request contains the tenant id, client id, client secret and redirect uri from the app registration, as well as the code generated in the previous step. In Postman the request looks like this:
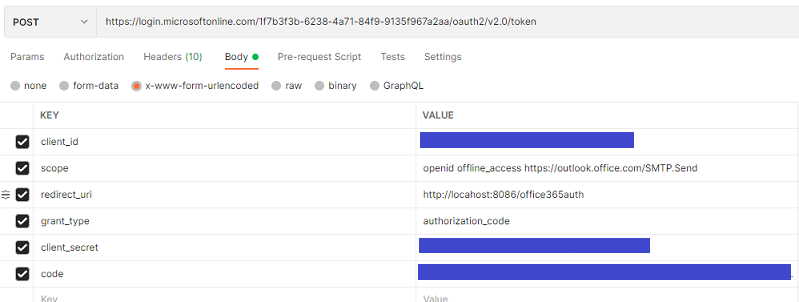
The output is an access_token and refresh_token. The access_token is used for the SMTP authentication. However, it expires after about 1 hour. The refresh_token can be used to generate a new access_token. The refresh_token supposedly works for about 24 hours, so we should warn the users that if the InterFormNG2 server is shut down for more than 24 hours, email sending will stop working and the settings process has to be repeated.
Send e-mail
Now we can finally send an e-mail. The generated access_token from the previous step needs to be combined with the e-mail address of the user sending the e-mail and then base64 encoded.
The Java code below can be used. In the code oauth2AccessToken is the access_token received from the webservice request above.
Possibly a more high-level solution can be made using JavaMailSender.
package com.interform400.webcontent;
import com.sun.mail.smtp.SMTPTransport;
import org.apache.commons.codec.binary.Base64;
import javax.mail.Message;
import javax.mail.Session;
import javax.mail.internet.InternetAddress;
import javax.mail.internet.MimeMessage;
import java.nio.charset.StandardCharsets;
import java.util.Properties;
public class TestEmailOauth2 {
public static void main(String[] args) {
String hostName = "smtp.office365.com";
int port = 587;
String username = "xx@interform400.com";
String protocol = "smtp";
Boolean useStartTLS = true;
String oauth2AccessToken = "xxxxxx";
try {
java.util.Properties props = new Properties();
props.put("mail.transport.protocol", protocol);
props.put("mail.smtp.port", port);
props.put("mail.smtp.starttls.enable", useStartTLS);
props.put("mail.smtp.sasl.enable", "true");
props.put("mail.smtp.auth.mechanisms", "XOAUTH2");
Session session = Session.getDefaultInstance(props);
session.setDebug(true); // TODO: Disable in production
MimeMessage msg = new MimeMessage(session);
msg.setFrom(new InternetAddress("bsj@interform400.com", "Brian Jensen"));
msg.setRecipient(Message.RecipientType.TO, new InternetAddress("xx@interform400.com"));
msg.setSubject("Test email from InterForm");
msg.setContent("Testing email settings", "text/html");
final char ctrlA = '\u0001';
String authstr = "user=" + username + ctrlA + "auth=Bearer " + oauth2AccessToken + ctrlA + ctrlA;
String encoded = Base64.encodeBase64String(authstr.getBytes(StandardCharsets.UTF_8));
SMTPTransport transport = new SMTPTransport(session, null);
transport.connect(hostName, username, null);
transport.issueCommand("AUTH XOAUTH2", 334);
transport.issueCommand(encoded, 235);
transport.sendMessage(msg, msg.getAllRecipients());
// Success
} catch (Exception e) {
// Handle error
}
}
}