With this advanced set meta data workflow component, you can add your own PJL commands in the PCL/PDF output from InterFormNG2 e.g. for enabling/disabling color printing, stapling, punching to select a specific output bin or include user ID and password in the print data stream
The PJL commands are added to the start of the merged PCL/PDF print data stream generated by InterFormNG2, if this is set in the workflow prior to the merge to PCL/PDF print.
The parameter for this component is:
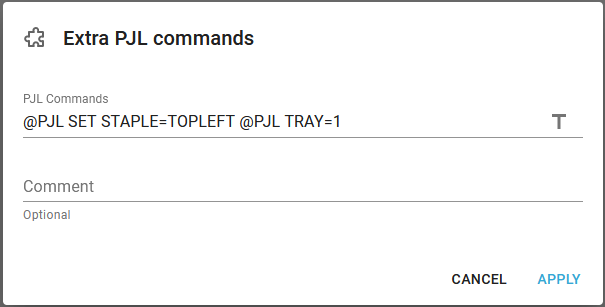
PJL Commands
The PJL commands, that you want to insert in the PCL output print data stream. Remember, that this is not limited to a constant text, but it can be an XPath expression, which can also use workflow variables. The PJL commands should be written as shown above: Each PJL command must start with @PJL, and you can insert multiple PJL commands as shown above. Each PJL command must be divided with hex 0A (Line Feed) and you can insert this by simply pressing Enter between each command. The commands can of course also be stated as an XPath expression to make it more dynamic.
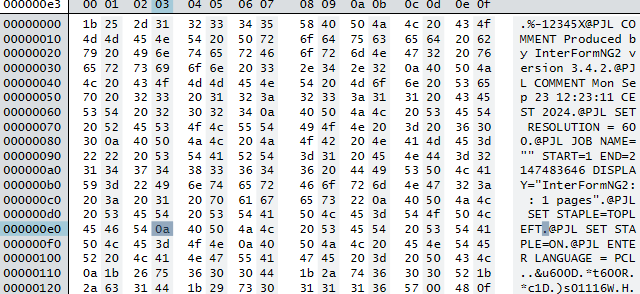
With the settings above the PJL commands in the output print data stream will be like below:
Stapling
It is possible to activate stapling on your printer when you print from InterFormNG2. For stapling you have two options:
1.If you are using PCL or PDF as the mime type, then you can use the description below.
2.If you are using Driver print, then the stapling is setup only on the printer driver and cannot be enabled/configured in InterFormNG2.
Example of how to define stapling
If you want to staple with the Extra PJL command workflow component, then you need to run this component before the print data stream is generated e.g. like below:

Here the Extra PJL command is executed prior to the print component, but it can also be followed by e.g Create PCL document if you want to keep the merged print data stream in the payload.
Identify the needed PJL commands for stapling
For stapling you first need to find out which PJL command(s), that are needed on your specific printer. Unfortunately there is no common standard so the commands can depend on the manufacturer and/or model of the printer.
The required PJL commands can perhaps be found in the documentation of the printer, but you can also consider to do a bit of 'reverse engineering' and create a printer, which prints to file and then print a small 2 page document with the use of the normal windows printer driver. After that you can open the generated pcl file in a simple editor like e.g. Notepad and here you can see the included PJL commands in clear text as the very first lines in this file.
Here is a list of the PJL commands required for stapling on some printers:
Printer(s) |
Function |
PJL sequence |
|---|---|---|
Canon iR 5000/6000 |
1 Staple ONEUPLEFT |
@PJL COMMENT CANPJL SET SORTERMODE=GENERICON @PJL COMMENT CANPJL SET STAPLE=ONEUPLEFT |
Canon iR 5000/6000 |
1 Staple ONELOWLEFT |
@PJL COMMENT CANPJL SET SORTERMODE=GENERICON @PJL COMMENT CANPJL SET STAPLE=ONELOWLEFT |
Canon iR 5000/6000 |
2 Staples TWOLEFT |
@PJL COMMENT CANPJL SET SORTERMODE=GENERICON @PJL COMMENT CANPJL SET STAPLE=TWOLEFT |
HP5Si Mopier |
Standard staple |
@PJL SET FINISH=STAPLE |
HP8150 / HP9000 |
1 Staple (5 bin stapler) |
@PJL SET OUTBIN=OPTIONALOUTBIN7 @PJL SET FINISH=STAPLE |
HP8150 / HP9000 |
1 Staple (3000 sheet stapler) |
@PJL SET OUTBIN=OPTIONALOUTBIN2 @PJL SET FINISH=STAPLE @PJL SET STAPLEOPTION=ONE |
HP8150 / HP9000 |
1 Angeled staple (3000 sheet stapler) |
@PJL SET OUTBIN=OPTIONALOUTBIN2 @PJL SET FINISH=STAPLE @PJL SET STAPLEOPTION=ONEANGELED |
HP8150 / HP9000 |
2 Staples (3000 sheet stapler) |
@PJL SET OUTBIN=OPTIONALOUTBIN2 @PJL SET FINISH=STAPLE @PJL SET STAPLEOPTION=TWO |
HP8150 / HP9000 |
3 Staples (3000 sheet stapler) |
@PJL SET OUTBIN=OPTIONALOUTBIN2 @PJL SET FINISH=STAPLE @PJL SET STAPLEOPTION=THREE |
HP8150 / HP9000 |
6 Staples (3000 sheet stapler) |
@PJL SET OUTBIN=OPTIONALOUTBIN2 @PJL SET FINISH=STAPLE @PJL SET STAPLEOPTION=SIX |
HP42nn / HP43nn |
Standard staple |
@PJL SET PROCESSINGTYPE="STAPLING" @PJL SET PROCESSINGOPTION="ONE_STAPLE" @PJL SET PROCESSINGBOUNDARY=MOPY |
IBM NP24 / IP32/40 |
1 Staple (portrait) |
@PJL SET STAPLE=ONEPORT |
IBM NP24 / IP32/40 |
2 Staples |
@PJL SET STAPLE=TWO |
IBM NP24 / IP32/40 |
1 Staple (landscape) |
@PJL SET STAPLE=ONELAND |
Kyocera 7000 / 9000 |
Standard staple |
@PJL SET FINISH=STAPLE |
Lexmark Optra N |
1 Staple |
@PJL SET LSTAPLE=1 |
Lexmark Optra N |
2 Staples |
@PJL SET LSTAPLE=2 |
Lexmark T630, T632 and T634 |
Standard staple |
@PJL SET LSTAPLE=ON |
Minolta DI520 / DI620 |
1 Staple ONEUPLEFT |
@PJL COMMENT EFIPJL SET OUTBIN=LOWER @PJL COMMENT EFIPJL SET STAPLE=ONEUPLEFT |
Minolta DI520 / DI620 |
2 Staples TWOUP |
@PJL COMMENT EFIPJL SET OUTBIN=LOWER @PJL COMMENT EFIPJL SET STAPLE=TWOUP |
Minolta DI520 / DI620 |
2 Staples TWOLEFT |
@PJL COMMENT EFIPJL SET OUTBIN=LOWER @PJL COMMENT EFIPJL SET STAPLE=TWOLEFT |
Minolta DI750 |
1 Staple UPLEFT |
@PJL COMMENT EFIPJL SET SLIPSHEET=GENERICOFF @PJL COMMENT EFIPJL SET BACKSLIPSHEET=GENERICOFF @PJL COMMENT EFIPJL SET INTERLEAVE=GENERICOFF @PJL COMMENT EFIPJL SET OUTBIN=LOWER @PJL COMMENT EFIPJL SET STAPLE=ONEUPLEFT @PJL COMMENT EFIPJL SET PUNCH=GENERICOFF @PJL COMMENT EFIPJL SET ZFOLD=GENERICOFF @PJL COMMENT EFIPJL SET InsertSheet=0 @PJL COMMENT EFIPJL SET SORTERMODE=GENERICOFF @PJL COMMENT EFIPJL SET minsmoothing=0 @PJL COMMENT EFIPJL SET WaitProof=0 |
Minolta DI750 |
1 Staple UPRIGHT |
@PJL COMMENT EFIPJL SET SLIPSHEET=GENERICOFF @PJL COMMENT EFIPJL SET BACKSLIPSHEET=GENERICOFF @PJL COMMENT EFIPJL SET INTERLEAVE=GENERICOFF @PJL COMMENT EFIPJL SET OUTBIN=LOWER @PJL COMMENT EFIPJL SET STAPLE=UPRIGHT @PJL COMMENT EFIPJL SET PUNCH=GENERICOFF @PJL COMMENT EFIPJL SET ZFOLD=GENERICOFF @PJL COMMENT EFIPJL SET InsertSheet=0 @PJL COMMENT EFIPJL SET SORTERMODE=GENERICOFF @PJL COMMENT EFIPJL SET minsmoothing=0 @PJL COMMENT EFIPJL SET WaitProof=0 |
Minolta DI750 |
2 Staples UP |
@PJL COMMENT EFIPJL SET SLIPSHEET=GENERICOFF @PJL COMMENT EFIPJL SET BACKSLIPSHEET=GENERICOFF @PJL COMMENT EFIPJL SET INTERLEAVE=GENERICOFF @PJL COMMENT EFIPJL SET OUTBIN=LOWER @PJL COMMENT EFIPJL SET STAPLE=TWOUP @PJL COMMENT EFIPJL SET PUNCH=GENERICOFF @PJL COMMENT EFIPJL SET ZFOLD=GENERICOFF @PJL COMMENT EFIPJL SET InsertSheet=0 @PJL COMMENT EFIPJL SET SORTERMODE=GENERICOFF @PJL COMMENT EFIPJL SET minsmoothing=0 @PJL COMMENT EFIPJL SET WaitProof=0 |
Minolta DI750 |
2 Staples LEFT |
@PJL COMMENT EFIPJL SET SLIPSHEET=GENERICOFF @PJL COMMENT EFIPJL SET BACKSLIPSHEET=GENERICOFF @PJL COMMENT EFIPJL SET INTERLEAVE=GENERICOFF @PJL COMMENT EFIPJL SET OUTBIN=LOWER @PJL COMMENT EFIPJL SET STAPLE=TWOLEFT @PJL COMMENT EFIPJL SET PUNCH=GENERICOFF @PJL COMMENT EFIPJL SET ZFOLD=GENERICOFF @PJL COMMENT EFIPJL SET InsertSheet=0 @PJL COMMENT EFIPJL SET SORTERMODE=GENERICOFF @PJL COMMENT EFIPJL SET minsmoothing=0 @PJL COMMENT EFIPJL SET WaitProof=0 |
Minolta DI750 |
2 Staples RIGHT |
@PJL COMMENT EFIPJL SET SLIPSHEET=GENERICOFF @PJL COMMENT EFIPJL SET BACKSLIPSHEET=GENERICOFF @PJL COMMENT EFIPJL SET INTERLEAVE=GENERICOFF @PJL COMMENT EFIPJL SET OUTBIN=LOWER @PJL COMMENT EFIPJL SET STAPLE=TWORIGHT @PJL COMMENT EFIPJL SET PUNCH=GENERICOFF @PJL COMMENT EFIPJL SET ZFOLD=GENERICOFF @PJL COMMENT EFIPJL SET InsertSheet=0 @PJL COMMENT EFIPJL SET SORTERMODE=GENERICOFF @PJL COMMENT EFIPJL SET minsmoothing=0 @PJL COMMENT EFIPJL SET WaitProof=0 |
Océ 3165 |
Standard staple |
@PJL COMMENT OCE *JEC BEGIN @PJL COMMENT OCE PROCESS: @PJL COMMENT OCE STAPLE ON @PJL COMMENT OCE FLAGSHEET OFF HEADER @PJL COMMENT OCE *JEC BODY |
Ricoh Aficio CL7000 |
1 Staple LEFTTOPSLANT |
@PJL SET OUTBIN=FINISHERSHIFT @PJL SET STAPLE=LEFTTOPSLANTPORT |
Ricoh Aficio CL7000 |
1 Staple RIGHTTOPSLANT |
@PJL SET OUTBIN=FINISHERSHIFT @PJL SET STAPLE=RIGHTTOPSLANTPORT |
Ricoh Aficio CL7000 |
1 Staple LEFTTOP |
@PJL SET OUTBIN=FINISHERSHIFT @PJL SET STAPLE=LEFTTOP |
Ricoh Aficio CL7000 |
1 Staple RIGHTTOP |
@PJL SET OUTBIN=FINISHERSHIFT @PJL SET STAPLE=RIGHTTOP |
Ricoh Aficio CL7000 |
2 Staples TOP2PORT |
@PJL SET OUTBIN=FINISHERSHIFT @PJL SET STAPLE=TOP2PORT |
Ricoh Aficio CL7000 |
2 Staples LEFT2PORT |
@PJL SET OUTBIN=FINISHERSHIFT @PJL SET STAPLE=LEFT2PORT |
Ricoh Aficio CL7000 |
2 Staples RIGHT2PORT |
@PJL SET OUTBIN=FINISHERSHIFT @PJL SET STAPLE=RIGHT2PORT |
Toshiba hanging finisher |
Portrait 1 staple UPLEFT |
@PJL COMMENT DSSC PRINT STAPLING=1 @PJL SET OUTBIN=OPTIONALOUTBIN2 |
Toshiba hanging finisher |
Portrait 1 staple UPRIGHT |
@PJL COMMENT DSSC PRINT STAPLING=256 @PJL SET OUTBIN=OPTIONALOUTBIN2 |
Toshiba hanging finisher |
Landscape 1 staple UPLEFT |
@PJL COMMENT DSSC PRINT STAPLING=33024 @PJL SET OUTBIN=OPTIONALOUTBIN2 |
Toshiba hanging finisher |
Landscape 1 staple UPRIGHT |
@PJL COMMENT DSSC PRINT STAPLING=1 @PJL SET OUTBIN=OPTIONALOUTBIN2 |
Toshiba other finisher |
Portrait 1 staple UPLEFT |
@PJL COMMENT DSSC PRINT STAPLING=769 @PJL SET OUTBIN=OPTIONALOUTBIN2 |
Toshiba other finisher |
Portrait 1 staple UPRIGHT |
@PJL COMMENT DSSC PRINT STAPLING=387 @PJL SET OUTBIN=OPTIONALOUTBIN2 |
Toshiba other finisher |
Portrait 2 staples UPPER |
@PJL COMMENT DSSC PRINT STAPLING=512 @PJL SET OUTBIN=OPTIONALOUTBIN2 |
Toshiba other finisher |
Portrait 2 staples LEFT |
@PJL COMMENT DSSC PRINT STAPLING=2 @PJL SET OUTBIN=OPTIONALOUTBIN2 |
Toshiba other finisher |
Landscape 1 staple UPLEFT |
@PJL COMMENT DSSC PRINT STAPLING=33027 @PJL SET OUTBIN=OPTIONALOUTBIN2 |
Toshiba other finisher |
Landscape 1 staple UPRIGHT |
@PJL COMMENT DSSC PRINT STAPLING=769 @PJL SET OUTBIN=OPTIONALOUTBIN2 |
Toshiba other finisher |
Landscape 2 staples UPPER |
@PJL COMMENT DSSC PRINT STAPLING=2 @PJL SET OUTBIN=OPTIONALOUTBIN2 |
Toshiba other finisher |
Landscape 2 staples LEFT |
@PJL COMMENT DSSC PRINT STAPLING=33280 @PJL SET OUTBIN=OPTIONALOUTBIN2 |
Toshiba other finisher |
2 staples BOOKLET |
@PJL COMMENT DSSC PRINT STAPLING=1024 @PJL SET OUTBIN=OPTIONALOUTBIN2 |
Xerox DC 240/255/265 |
Standard staple |
@PJL COMMENT XRXbegin @PJL COMMENT OID_ATT_FINISHING OID_VAL_FINISHING_STAPLE @PJL COMMENT XRXSTAPLE=PORTRAIT @PJL COMMENT XRXend |
Xerox N24 / N32 / N40 |
1 Staple (portrait) |
@PJL SET FINISH=STAPLEFRONT |
Xerox N24 / N32 / N40 |
2 Staples |
@PJL SET FINISH=STAPLEDUAL |
Xerox N24 / N32 / N40 |
1 Staple (landscape) |
@PJL SET FINISH=STAPLEREAR |
Verifying the generated output from InterFormNG2
Getting the printer to actually staple can be a bit tricky, so at some point you might want to verify the output, that is generated by InterFormNG2. One simple way to do that is to replace the workflow component, print with Create PCL document followed by To filesystem to save the PCL payload. Then you can open this file in Notepad and view the contents. You can even send this verified output to the printer with the components: Set printer followed by To printer.
Troubleshooting: The printer is still not stapling
If the printer is not stapling even after you have added the correct PJL commands, then you can consider if this is caused by the issues below:
1) Does the output PCL file contain multiple pages? If it only contains a single page, then the printer might ignore the PJL staple command as stapling a single page can cause a problem perhaps a paper jam. The printer might also refuse to staple if there are too many pages, but I am not sure about that.
2) Perhaps you need more than just the single PJL command than you use in order to make the printer staple the output. The stapler in the printer is often only installed in one of the output bins, so you might also need a PJL command to select the right outbin bin.
3) Here is a suggestion, if you are here replacing InterFormNG2 with InterForm400. It might be a good idea to verify what the output from InterForm400 is when you activate stapling in InterForm400. If you in InterForm400 merge to an output queue, where the spooled file is kept and I suggest to look into the contents of the merged output spooled file by first looking at the output queue with the command: APF3812/APFWRKOUTQ (use the output queue of the merged spooled file as parameter).
Now you see a list of spooled files and here you should use the hidden option 'A' next to the merged spooled file. Then you can see both the PJL commands and the PCL commands in the spooled file and you can now compare the PJL commands in the start with the PJL commands, that are inserted in InterFormNG2.