You can execute an SQL lookup anywhere in InterFormNG2 (including in the designer) with the built-in Xpath function, ng:databaseLookup.
An alternative to this function is the xent files, which can be used for lookup in the workflow only.
Other related workflow components are: Database SQL select and Database SQL update.
The function has these parameters:
ng:databaseLookup(DATABASENAME, SQL, PARAMETER1, PARAMETER2......)
where
DATABASENAME is the name of the database, defined in the tenant settings.
SQL is the sql statement to run
PARAMETERX are the parameters to replace in the SQL. The values of the parameters are substituting the ? in the same sequence as the appear.
The SQL statement is executed as a prepared statement, meaning safe ? parameter replacement can be done.
Example
ng:databaseLookup('mySqlDemo', 'select * from employees where id=?', '1002')
will replace ? with 1002 inside the SQL
The ng:databaseLookup returns a XML tree (not a normal XML tree - but a nodeset, so you need to use the prodecure below to extract data). that can be used for xpath expressions.
The result returned is in the format:
<result>
<row>
<fieldname1>Content</fieldname1>
<fieldname2>Content</fieldname2>
</row>
<row>
<fieldname1>Content2</fieldname1>
<fieldname1>Content2</fieldname1>
</row>
<result>
where row is each result in the result set from the database and <fieldname> is the name of the column in the database.
So in order to extract a specific value (string or number) from the nodeset returned from the function, ng:databaseLookup, you will need to add a selection of specific node e.g. like so:
ng:databaseLookup('mySqlDemo', 'select * from employees where id=?', '1002')/result/row[1]/fieldname1
This can e.g. be used like below in the workflow component, Set one workflow variable:
Handle fields named the same as a reserved word
If you in an SQL expression e.g. want to refer to a field in a table, that is named the same as a reserved word e.g. USER, then you need enclose in double-quotes to notify the Relational Engine that the word is not being used as a keyword in the given context. Here the double quotes are added around the USER field:
ng:databaseLookup('PROD','select OUTQ from APF3812/USRQUEP where "USER"=?','KSE')/result/row[1]/OUTQ
IBM i platform: Use a library list to select the IBM i files in the SQL expression
It is possible to dynamically select the files on the IBM i platform via a library list. You just need to exclude the library in the reference to the file. The setup of the library list is covered in the section, How to select files in SQL via a library list on IBM i on the database connection.
Below you can find a few examples of how this function can be used:
1.Example 1: How to present the multiple results from an SQL lookup in the designer.
4.Example 4: How to use the ng:database function to add extra data into a spooled file.
5.Example 5: How to convert database table with known fields into XML
6.Example 6: Convert database table/file into XML - generic
7.Example 7: Convert database table/file into Excel
Example 1: Present the multiple results from an SQL lookup in the designer
ng:databaseLookup('mySqlDemo', 'select * from employees')
gives the result:
<result>
<row>
<employeeNumber>1002</employeeNumber>
<lastName>Murphy</lastName>
<firstName>Diane</firstName>
<extension>x5800</extension>
<email>dmurphy@classicmodelcars.com</email>
<officeCode>1</officeCode>
<jobTitle>President</jobTitle>
</row>
<row>
<employeeNumber>1056</employeeNumber>
<lastName>Patterson</lastName>
<firstName>Mary</firstName>
<extension>x4611</extension>
<email>mpatterso@classicmodelcars.com</email>
<officeCode>1</officeCode>
<reportsTo>1002</reportsTo>
<jobTitle>VP Sales</jobTitle>
</row>
....
</result>
The result columns can be selected with XPATH expressions, e.g.
ng:databaseLookup('mySqlDemo', 'select * from employees where employeeNumber=?','1002')/result/row[1]/firstName
will select the text "Diana"
and in a repeat, looping through
ng:databaseLookup('mySqlDemo', 'select * from employees where employeeNumber=?','1002')/result/row
will make it possible to lookup
./firstName
./lastName
inside the repeat.
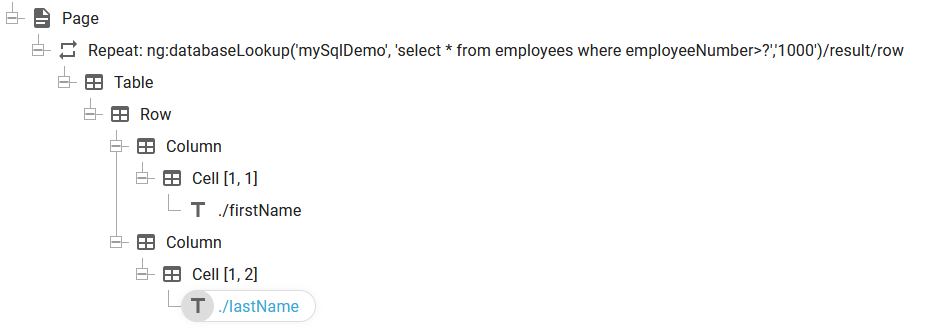
Here is how this looks in the designer, if we want to list the first and last names of the employees with an employeeNumber, that is larger than 1000:
Here you will also see a warning/error in the repeat element like below:

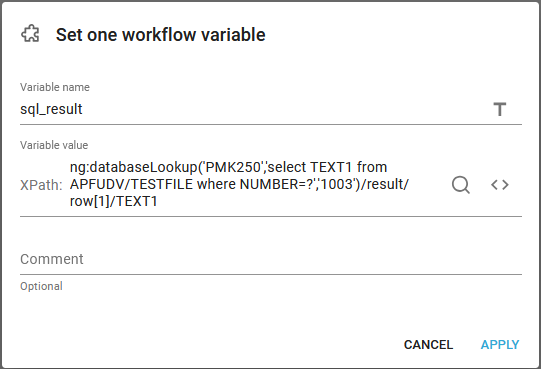
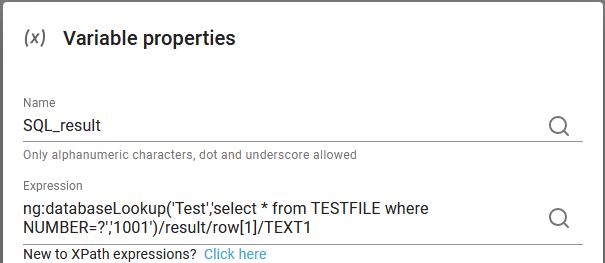
Example 2: How to retrieve a value with the ng:databaseLookup function into a variable in designer and workflow
If you want to extract a value from a database via SQL and add that into a variable in either the designer or the workflow, then you can simply do it as below:
In the designer you can do it like below - to extract the field named TEXT1 from the first record:
In the workflow you do it in a similar manner:
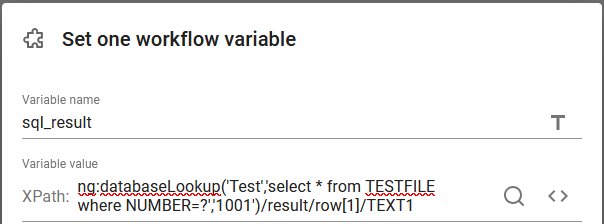
You can also verify the result if you insert the debug headers workflow component after this.
Example 3: How the ng:databaseLookup function can be used for adding data into XML with a transformation
If you want to add extra data into an XML file in the workflow, then you can use the Enrich XML from database workflow component, but you can also use the function, ng:databaseLookup in a transformation.
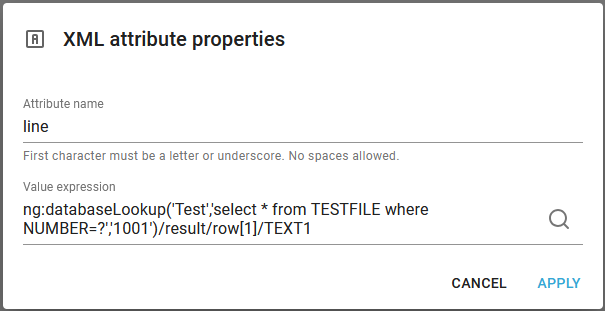
Here is an example, where an attribute is added and the value is found with ng:databaseLookup:
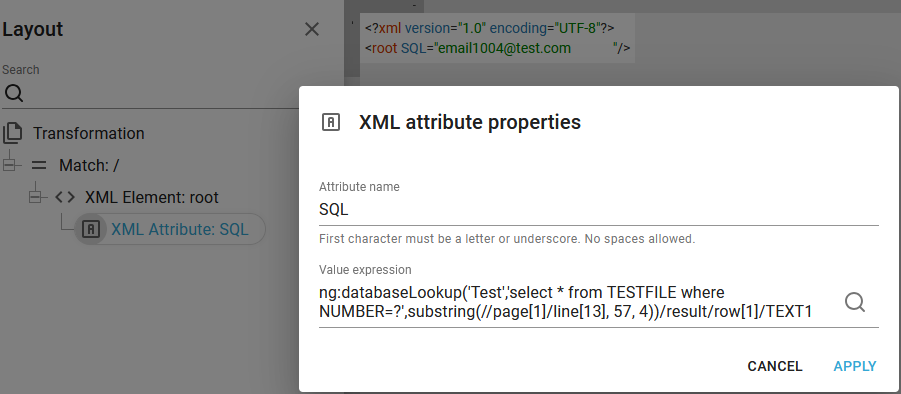
(This extracts information from page 1, line 13 position 57-60 and does a lookup in the file/table, TESTFILE and extracts the TEXT1 field).
If you expect multiple records from the SQL lookup, then you can do a repeat similar to the setup in Example 1.
Example 4: How to add SQL data into a spooled file with the ng:databaseLookup function in a transformation.
If you want to add data found via an SQL, then you can consider the workflow component, Enrich spooled file from database, but you can also use the ng:databaseLookup in a transformation.
A prerequisite for the procedure below is, that you have a license code for InterFormNG2, which includes support for XML files.
An alternative to the sections below is to transform the spooled file into an XML and here use the ng:databaseLookup function as a value in the output XML nodes as example 3 above.
Here you have 3 ways to add this extra data:
Example 4a: Add sql data into an extra spooled file attribute.
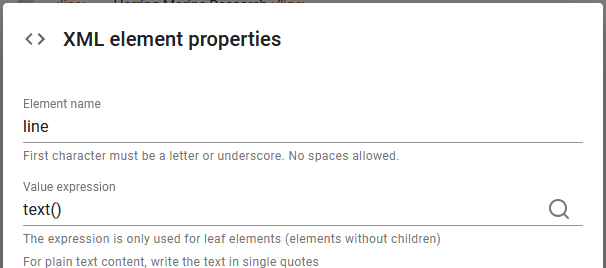
Example 4b: Add the data into a spooled file line.
Example 4c: Add the data into a new (hidden) node in the spooled file inside the page node.
A prerequisite for each of these ways is, that we first prepare a generic transformation, which can transform a spooled file into the same spooled file. The generic transformation is described in the section Transformation designer.
Example 4a: Add sql data into an extra spooled file attribute
This section is based on a generic spooled file transformation, so you need to build such a transformation before you continue.
In the generic spooled file transformation we can add an extra SQL attribute like below:
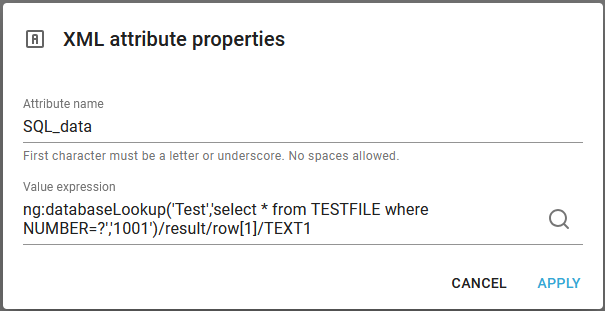
This is added after the other attributes in the same node:
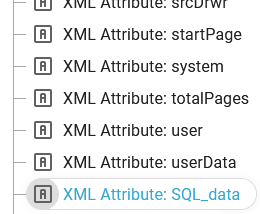
The advantages with this is, that the contents of the original spooled file is unchanged (we are not overwriting anything) and that this attribute is directly visible in both the designer and in the workflow as an extra attribute like below.
The disadvantage with this solution is, that the SQL data is added once for the whole spooled file and not per spooled file line or per spooled file page, but that can be done with the other suggestions below.
You can find the attributes under the Attributes tab when you refer to the spooled file in an Xpath expression:
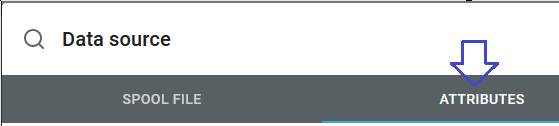
and here we can select the new SQL_data attribute by clicking on it:
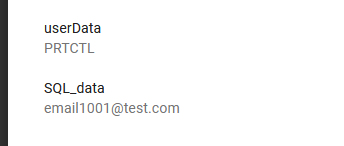
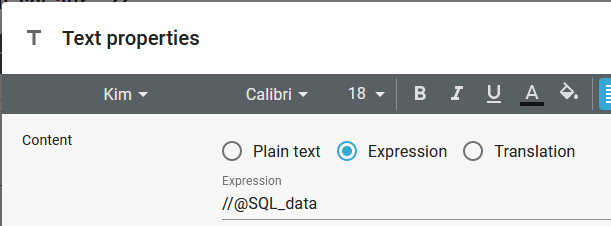
The Xpath expression added is //@SQL_data: (The name we specified above for the attribute name)
Example 4b: Add the data into a spooled file line
This section is based on a generic spooled file transformation, so you need to build such a transformation before you continue.
In this case we want to keep the original spooled file, but we want to overwrite the contents of specific spooled file line(s) with the result of an SQL database lookup.
The advantage with this solution is, that you can immediately see the value, that was found with the SQL lookup and that you can insert this value dynamically per spooled file line and even extract data from the current spooled file line and use that as a part of the SQL lookup, but the disadvantage is, that you might overwrite/mix/confuse original spooled file data with the extra SQL data.
In the generic spooled file transformation we have a repeat loop for all the line nodes in the input spooled file and inside this repeat loop we need to identify the current line number and here select another value if one of the relevant line nodes has been found.
The current line number is identified with this calculation: count(preceding-sibling::*) + 1, so when this expression is e.g. equal to 1, then the current line node is the first line.
This can be implemented like below:
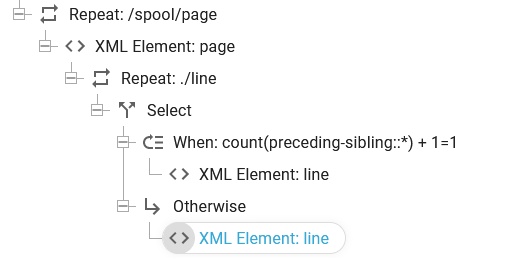
Now we insert two different line nodes depending on if this condition is true or not. In this case we want to ignore the original spooled file contents of line 1 and instead insert the result of the SQL lookup. That is done with these XML elements:
The first one inserts the result of an SQL:
And the second inserts the value from the input spooled file:
Example 4c: Add the data into a new (hidden) node in the spooled file inside the page node
This section is based on a generic spooled file transformation, so you need to build such a transformation before you continue.
Instead of adding extra data into line or an attribute of a spooled file we can also choose to insert the SQL data as an extra node in the spooled file. If the node name is not page or line, then it will be ignored by the spooled file viewer and the SQL data can only been seen if we view the spooled file as an XML file, which is not how the designer and workflow editor works.
The specific with this option compared to the other options is, that the data added with SQL is hidden and is not normally not seen in the spooled file view in the designer and the workflow. You need to view the spooled file as an XML file in order to see the hidden data. This normally considered a disadvantage, but can also be used as a way to separate the displayed and merged result with data, that is only used in the workflow e.g. you can there use an email address inserted via an sql lookup, which does not need to be presented in a print out or PDF file.
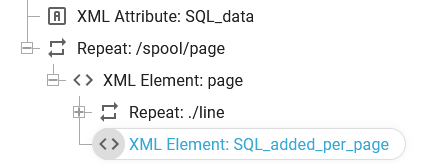
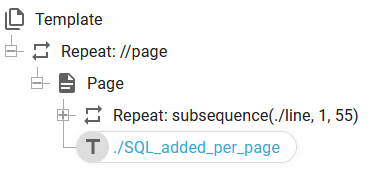
So we can choose any node name e.g. SQL_added_per_page like below:
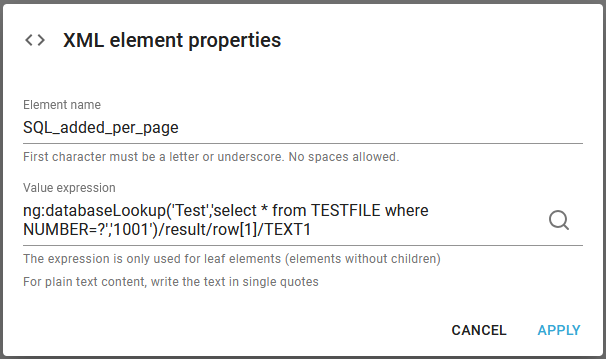
And inserted inside the page node like below:
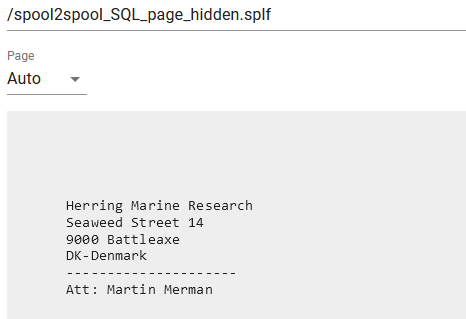
In e.g. the designer we still only see the spooled file contents as before:
But if we know the name of the hidden node, then we can now map it into the output:
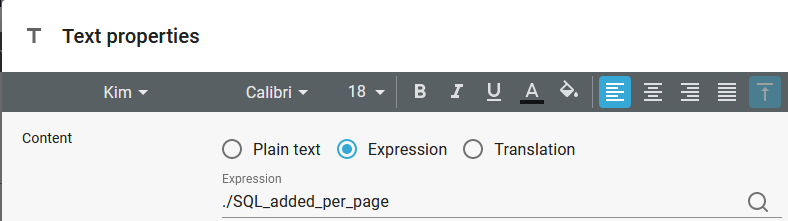
This is found within the page node, so this only works within a page-repeat like below:
Example 5: How to convert DB table/file with known fields into XML
If you have a database table/file with known fields, then you can combine the ng:databaseLookup function with a transformation template to convert the table/file into an XML file.
As an example we can consider a file/table with these fields:
MAILTS |
KEY1 |
MAIADR |
MAINAM |
MAICDP |
|---|---|---|---|---|
DEMOKEYS |
1001 |
Cust1001@interform400.com |
Name1001 |
37 |
DEMOKEYS |
1002 |
Cust1002@interform400.com |
Name1002 |
37 |
We want to extract all records where the field, MAILTS is equal to 'DEMOKEYS' and present all of the other fields in an output XML.
We can do that with this Xpath expression:
ng:databaseLookup('PROD','select * from apf3812/maiadrp where MAILTS=?', 'DEMOKEYS')
Where
PROD is the identification of the database connection.
apf3812/maiadrp is the database file (a file on an IBM i) which contains the data, that we want to extract.
The expression actually returns an XML nodeset, which we can use in a repeat in a transformation as below:
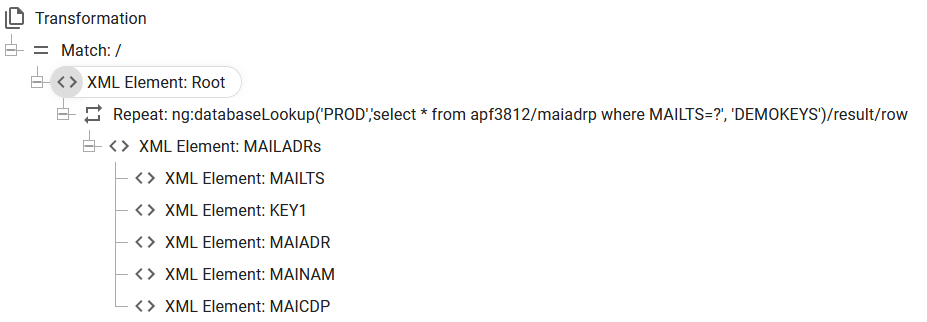
The repeat is setup with this expression:
ng:databaseLookup('PROD','select * from apf3812/maiadrp where MAILTS=?', 'DEMOKEYS')/result/row
With this expression the repeat iterates through each record, that has been extracted.
Inside this repeat we create a node with a name, that match the field name in the file and then extract the value from the nodeset created by the repeat element:
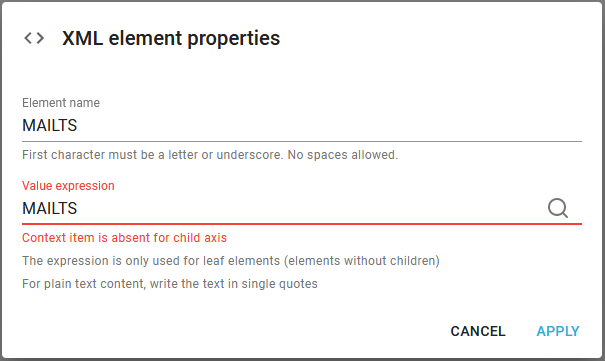
All the elements are defined in this manner: Create the element and refer to the XML node with the same name.
You may notice the error/warning message in the designer: Context item is absent for child axis. The reason for this is, that we have not loaded a sample XML file, so the XML nodes are unknown to the transformation designer. So we need to type them in manually and not select them via the magnifying glass as we normally do.
With this setup the output from the transformation may look like below:
<?xml version="1.0" encoding="UTF-8"?>
<Root>
<MAILADRs>
<MAILTS>DEMOKEYS </MAILTS>
<KEY1>1001</KEY1>
<MAIADR>customer1001@interform400.com</MAIADR>
<MAINAM>Name1001</MAINAM>
<MAICDP>37</MAICDP>
</MAILADRs>
<MAILADRs>
<MAILTS>DEMOKEYS </MAILTS>
<KEY1>1002</KEY1>
<MAIADR>customer1002@interform400.com</MAIADR>
<MAINAM>Name1002</MAINAM>
<MAICDP>37</MAICDP>
</MAILADRs>
<MAILADRs>
<MAILTS>DEMOKEYS </MAILTS>
<KEY1>1003</KEY1>
<MAIADR>customer1003@interform400.com</MAIADR>
<MAINAM>Name1003</MAINAM>
<MAICDP>37</MAICDP>
</MAILADRs>
<MAILADRs>
<MAILTS>DEMOKEYS </MAILTS>
<KEY1>1004</KEY1>
<MAIADR>customer1004@interform400.com</MAIADR>
<MAINAM>Name1004</MAINAM>
<MAICDP>37</MAICDP>
</MAILADRs>
</Root>
This transformation can be used in a workflow to set the payload accordingly:

The transformation is setup like below:

If the field names are unknown (or there are too many to manually define) then you can consider to look into example 6 below.
Example 6: Convert database table/file into XML - generic
In example we would like to avoid to specify each field/node in the input file and output XML file, so this should do the conversion into XML in a generic way.
TIP: If you want to skip the explanation and go straight to the spoiler, then you can jump to that via this link.
In this example we again refer to the same database file as in example 5 above, but in this case we want to output all fields from the database. Actually the database contains a lot more fields than these:
MAILTS |
KEY1 |
MAIADR |
MAINAM |
MAICDP |
|---|---|---|---|---|
DEMOKEYS |
1001 |
Cust1001@interform400.com |
Name1001 |
37 |
DEMOKEYS |
1002 |
Cust1002@interform400.com |
Name1002 |
37 |
So when we execute this xpath function:
ng:databaseLookup('PROD','select * from apf3812/maiadrp where MAILTS=?', 'DEMOKEYS')
(Refer to example 5 above for details of this expression)
- then we get a nodeset with many more nodes than are listed above and now we even want to output all the fields without having to name them manually one by one.
Unfortunately we can currently not dynamically set the node name in transformation so each node must have a fixed name, but we can add an extra node with the name of the field in the output XML file.
We can do that with a transformation with this setup:
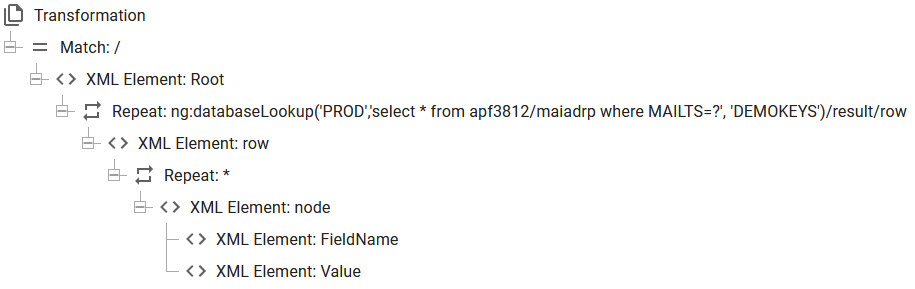
This setup is so generic that only the parameters of the ng:databaseLookup() are to be changed for another database file.
This setup use a few special setups:
The first repeat goes through all rows of the extracted XML nodeset. For each of these nodes we insert a node called 'row'. You can of course use another name if you want.
Inside the row element things get more interesting..
We have inserted an extra repeat inside the row element. This repeat to iterate across an unknown number of fields found in each record/row with this setup:

We simply use an asterix (*) to define a repeat for all fields/nodes found in the row no matter what the name of the field/node is. Please note, that we can ignore the error/warning as the designer tries to validate the expression based on the sample xml file which may have been selected - in this case no sample XML file has been loaded - hence this warning.
Inside this repeat we can now add a main node, called node and two sub-nodes to describe the field from the input database file: The name of the field and the value.
The node, FieldName is defined in this way:
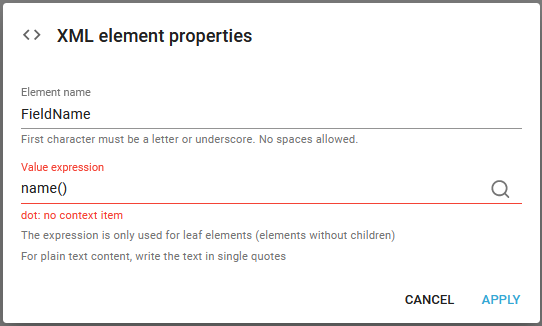
With the expression, name() we extract the name of the current node (found via the repeat) and put it into the FieldName node.
The Value node is setup similar:
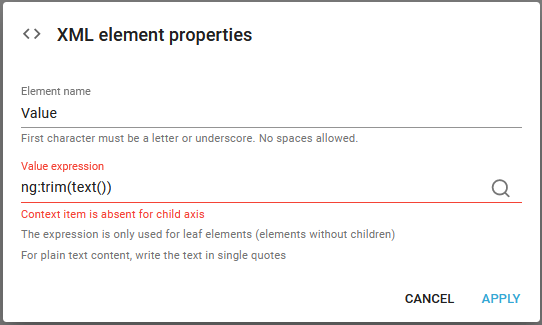
Here we are using the xpath function, text() to extract the value of the current node and we have added the optional function ng:trim() to trim all leading and trailing spaces. You may not need this in your setup, but it might reduce the size of the XML quite a lot.
With the settings above the resulting output XML file looks like this:
<?xml version="1.0" encoding="UTF-8"?>
<Root>
<row>
<node>
<FieldName>MAILTS</FieldName>
<Value>DEMOKEYS</Value>
</node>
<node>
<FieldName>KEY1</FieldName>
<Value>1001</Value>
</node>
<node>
<FieldName>KEY2</FieldName>
<Value/>
</node>
<node>
<FieldName>KEY3</FieldName>
<Value/>
</node>
<node>
<FieldName>MAIADR</FieldName>
<Value>customer1001@interform400.com</Value>
</node>
<node>
<FieldName>MAINAM</FieldName>
<Value>Name1001</Value>
...
</node>
</row>
<row>
...
</row>
...
</Root>
This may not be exactly what we want. It would look much better if the name of the nodes would be the same as the fields from the input database file and that is possible, but only if we move from a transformation template onto an xsl transformation instead.
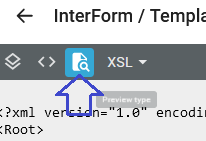
In the transformation designer we can find the xsl file, that does the same as above if we click this icon on the top:
If we then scroll to the bottom we can find the similar xsl transformation:
<?xml version="1.0" encoding="UTF-8"?>
<xsl:stylesheet xmlns:xsl="http://www.w3.org/1999/XSL/Transform"
xmlns:ng="http://www.interform400.com/"
exclude-result-prefixes="ng"
version="2.0">
<xsl:output indent="yes" method="xml"/>
<xsl:template match="/">
<Root>
<xsl:for-each select="ng:databaseLookup('PROD','select * from apf3812/maiadrp where MAILTS=?', 'DEMOKEYS')/result/row">
<row>
<xsl:for-each select="*">
<node>
<FieldName>
<xsl:value-of select="name()"/>
</FieldName>
<Value>
<xsl:value-of select="ng:trim(text())"/>
</Value>
</node>
</xsl:for-each>
</row>
</xsl:for-each>
</Root>
</xsl:template>
</xsl:stylesheet>
We now need to copy this text to an xsl file and edit it to do what we want.
Short cut for an XSL solution
If we change the xsl above to the xsl below, then we get a better result:
<?xml version="1.0" encoding="UTF-8"?>
<xsl:stylesheet xmlns:xsl="http://www.w3.org/1999/XSL/Transform"
xmlns:ng="http://www.interform400.com/"
exclude-result-prefixes="ng"
version="2.0">
<xsl:output indent="yes" method="xml"/>
<xsl:template match="/">
<Root>
<xsl:for-each select="ng:databaseLookup('PROD','select * from apf3812/maiadrp where MAILTS=?', 'DEMOKEYS')/result/row">
<row>
<xsl:for-each select="*">
<xsl:variable name="fieldName" select="name()"/>
<xsl:element name="{$fieldName}">
<xsl:value-of select="ng:trim(text())"/>
</xsl:element>
</xsl:for-each>
</row>
</xsl:for-each>
</Root>
</xsl:template>
</xsl:stylesheet>
The changed lines are marked in bold above.
In order to use this xsl file as a transformation we first need to insert it into a text file (with the extension .xsl) and then upload it to the transforms library.
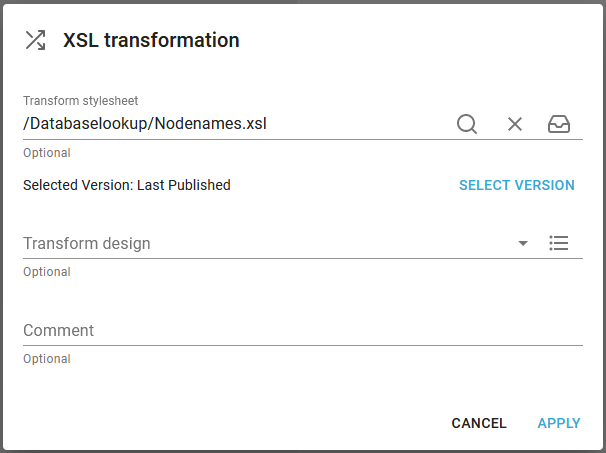
With this in place we can now activate the transformation in a workflow like below:

The important component is the XSL transformation, which is setup as below:
The resulting XML file has this structure:
<?xml version="1.0" encoding="UTF-8"?>
<Root>
<row>
<MAILTS>DEMOKEYS</MAILTS>
<KEY1>1001</KEY1>
<KEY2/>
<KEY3/>
<MAIADR>customer1001@interform400.com</MAIADR>
<MAINAM>Name1001</MAINAM>
<MAI2AD/>
<MAI2NA/>
<MAI3AD/>
<MAI3NA/>
<MAI4AD/>
<MAI4NA/>
</row>
<row>
<MAILTS>DEMOKEYS</MAILTS>
<KEY1>1002</KEY1>
<KEY2/>
<KEY3/>
<MAIADR>customer1002@interform400.com</MAIADR>
<MAINAM>Name1002</MAINAM>
<MAI2AD/>
<MAI2NA/>
<MAI3AD/>
<MAI3NA/>
<MAI4AD/>
<MAI4NA/>
</row>
</Root>
Example 7: Convert database table/file into Excel
It is possible to convert a database table/file into Excel. The procedure is very similar to the conversion into XML as described in example 5 and example 6 above. Especially example 6 can be interesting if you want to handle generic fields without the need to state the name of each field.
The table/file has this layout:
MBRNVN |
MBRTXT |
|---|---|
LIVE |
This is the live file set |
SAMPLE |
This is the sample file set |
In this example we simply want to list these two fields from all records - select all.
In order to convert the database file into Excel we open the Excel designer and here setup an excel template like below:

The repeat element is setup with this expression:
ng:databaseLookup('PMK250','select * from apf3812/apfmbrp')/result/row
PMK250 refers to a database connection and the 'select * from apf3812/apfmbrp' selects all records from the table/file: apf3812/apfmbrp. At the end we add '/result/row' to make a repeat, that iterates over all the records found. As the first element inside the repeat is the row element, a new row is created for each record found.
Inside the row element we insert two cells to match the fields of the file.