Designing the overlay
Open up the ‘General’ folder to view the general settings for the overlay, that you are designing:
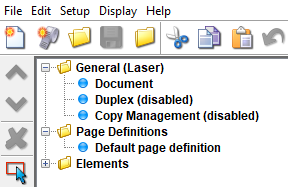
The options within does the following:
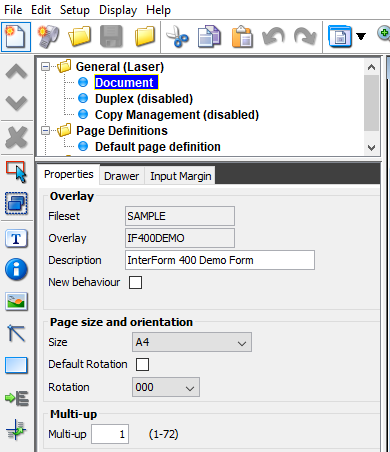
Document
Displays the file set and overlay name. You can change the description of the overlay, size and orientation of the paper, multi-up (Pages per side) and margins (number of lines and/or characters to move the spooled file down or right).
New behaviour
You can chose how rotation should be handled via the ‘New behaviour’ option above.
If Disabled: Works like pre 2017 versions of InterForm400
If this is disabled, the rotation of elements depends on element type. Text, remap window will e.g. change the reference point depending on rotation and the frames and line are always using the positions as written in portrait rotation.
The rotation of sub-overlays is ignored and only the rotation of the main overlay is used. Conditioned overlays are positioned in the same manner as in earlier versions of InterForm400.
Pro: Works like in older versions of InterForm400. It is possible to export overlays for use in older versions of InterForm400.
Con: Rotation of overlays is not easy - each element must be rotated individually. Repositioning of conditioned overlays has limitations.
If Enabled: New behaviour introduced in 2017 versions. If the New behaviour option is enabled, you can easily rotate a complete overlay by changing the rotation in the document properties above.
If you rotate texts and remap windows, then they will rotate around a fixed position set from the upper left corner - in whatever rotation you are using. Positions of lines and frames are set relatively to the document rotation.
The conditioned overlay can be rotated relatively to the main overlay. The rotation is set on the conditional element in the main overlay. The rotation of unconditioned overlays is ignored, and the rotation of the main overlay is used for the elements inside.
Positioning of conditioned overlays has been improved, so that absolute and relative positioning in both the horizontal and vertical direction are fully supported. Relative positioning relates to the placement of the input spooled file text as specified in the global setting (extended page definition).
Pro: With the new behaviour you can easily rotate complete designs by rotating the setting on the main overlay, and you can also rotate as well as reposition conditioned overlays. This is a more intuitive way to design. With this it is easy to reuse a conditioned suboverlay multiple times with different positions (and different rotations) in main overlays.
Con: The new behaviour option is not supported for pre 2017 versions of InterForm400, so you cannot import such overlays in older versions - if you do they might look wrong.
Size
If you select ‘Custom’ as the size, then you are also asked for the length and width of the paper as shown above. If you select other than Custom these input fields will not be shown.
Use the multi-up option if you want to insert multiple input pages on each output page.
Activate duplex if needed. (Not available for label output). Duplex cannot be combined with copy management for the normal duplex type.
You can only save a duplex overlay, if duplex is enabled on the file set, that you are saving the overlay into. If the duplex option is not enabled on the file set, you will get this error message:
‘Unable to save. Unable to save overlay. Fileset does not support duplex’.
To get around this error message you either need to save to another file set or enable duplex for this file set). If duplex is disabled (if you e.g. use simplex printer types), only the front of the paper is used (simplex).
Duplex is ignored for PDF output - so any fixed back or front overlay is not included in the PDF result.
For printing duplex you also need to select a duplex printer type in InterForm400 when you do the merge.
It is possible to print partially in duplex, if you are using an overlay selector, which switches between duplex and simplex overlays.
The duplex options are shown here:
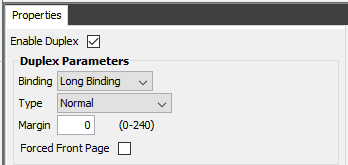
Binding:
Possible values are ‘Long Binding’ and ‘Short Binding’. This works with the Margin field below. The binding indicates around which paper edge the duplex is to be done. When duplex is enabled you decide if the individual elements are to be inserted only on odd or even pages via the (See page management).
Type:
The type of duplex, that you want to use. Possible values are:
Normal
Normal duplex: Saves paper by printing spooled file data on both back and front. Please note the ‘Forced front page’ option below, if you are printing multiple documents in each spooled file.
Fixed Back Page
Inserts a fixed overlay on the back - without spooled file data. This can be used for ‘Terms of delivery’ or similar.
Fixed Front Page
Similar to the Fixed Back Page - this is however printed on the front - prior to the page with the spooled file data. This can be used on printers, that are printing duplex pages in reverse order.
Variable Back page
Similar to the Fixed Back Page except you can combine information on the ‘front’ page with a prefix to identify which overlay to use on the back:
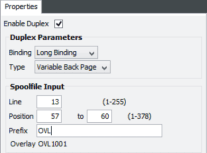
In the example above we are using the prefix, OVL combined with the information found in the spooled file in line 13, position 57-60. As the current page contains ‘1001' in these positions, the back page inserted will be ‘OVL1001'. The length of the Prefix plus the length of the string found in the spooled file cannot exceed a total of 10 characters.
Forced front page:
Can/should be used if you use duplex print without a fixed back/front overlay and you can have multiple documents in each spooled file. This option controls if the overlay, for which the Duplex function has been selected, always should be printed on a front page, when used. If you activate this, you can avoid that the first page of a document is printed on the duplex side of the previous page.
You need however to use this with an overlay selector and another, similar overlay with ‘Forced front page’ deactivated, which is to be selected for any page of the spooled file, that is not the initial page of a document.
Margin:
This value in the field states the width of the duplex binding margin in n/240 inch. The complete overlay will be displaced with this margin to make extra space for binding/holes.
Sets specific Zebra (ZPL) parameters: Printing speed and relative temperature. This is only relevant if you create an overlay for Label printing e.g. with this icon:

The parameters are:
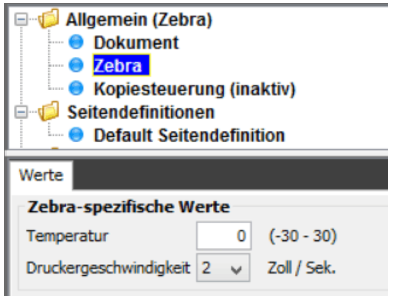
Temperature:
The relative temperature to use for this overlay. If you set it to 0 (zero), then the temperature setting on the printer will be used. Another value (which can be negative) will be added to the temperature setting on the printer. A higher value will create a darker output, but may also mean more tear on the printer head.
Printer speed:
The printing speed of this specific overlay. Unsupported speeds will be ignored by the printer.
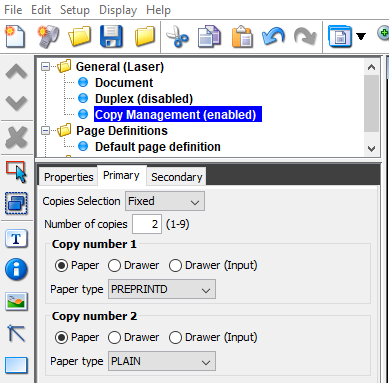
Copy Management can be used for printing duplicates of each page like this: Page 1, Page 1, Page 2, Page 2 etc... Up to 9 copies can be created. Alternatively you can create multiple copies with the COPIES attribute or simply by doing multiple merges. Each copy can be different as you can condition the design elements on the copy number - and also on if it is a primary or secondary merge. (You can set ‘primary’ or ‘secondary’ during the merges. Primary is default).
Additional information about copy management is included for the green screen designer.
Here you can activate or change the attributes of Copy Management:
Copy Management can also be combined with stapling.
Copy Management has these parameters, which can be set for both primary and secondary:
Copies Selection:
Fixed:
A fixed number of copies are to be printed of each page.
Variable:
The number of copies is variable and picked from the actual spooled file page in a specific position. This position should be numeric. If the position is not numeric, the number of copies will be 1.
Spool Input:
The COPIES attribute of the input spooled file is used as the number of copies.
Copy management for ZPL/label printing
The number of copies is however different for ZPL/label printing. Here the number if copies (if it is set to be variable thus found in as text in the input spooled file) is expected to be specified as a 4 digit number, which is right aligned e.g. if you e.g. for label printing specify that the number of copies is found in position 1 in line 1, then InterForm400 will extract positions 1 to 4 in line 1 and use that as the number of copies e.g. if the value found is 0001, then 1 copy will be printed, the value 0011 will cause 11 copies.
For each of the copies you can select the paper drawer/tray as:
Paper:
Select the paper tray for this copy via a paper type.
Drawer:
Select the paper tray as a PCL drawer number.
Drawer (Input):
The drawer can also be set as Input, which means, that the drawer selected in the input spooled file will be used.
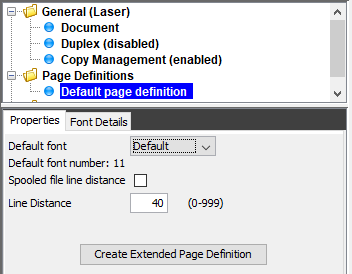
Page definitions refers to the default font, line height and Extended Page definitions.
The fields are:
Default font
Possible value are:
None (Blank)
No spooled file data is shown in the output unless it has been remapped or tabulated.
Default
All spooled file data is shown in a default font (font 11).
Select
Select the default font for the spooled file via a drop down list.
Line Distance
The default line distance is 40 pels which equals 6 lines per inch (LPI). This is the basis for the placement of relatively placed conditioned overlays. It is a good idea to select a line distance that fits the font size you intend to use. Also be sure that the output page is high enough to include all spooled file lines needed.
In the bottom of the page definition setup you see this icon:

If you press that, then you can tell InterForm400 how to format the spooled file lines from a specific line. (Remember that the tabulators and conditioned overlays will reposition the output relative to these positions, and that you can override this with a remap window element). If you create a new Extended Page Definition you will see this:
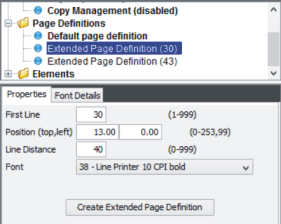
Above the start line is set to 30, and another page definition is set to start at line 43, so it means that we have set some specific line distances/heights for these intervals of spooled file lines:
1-29
30-42
43-
In the range 30 to 42 the spooled file lines will be printed 13 cm (that is the measurement used here) from the top, with 6 lines per inch and printed in a bold font (font 38).
In this way we can create multiple columns in the output, or print the detail lines of a document with a different line distance than the rest of the document.
For more information of extended page definition
The spool view
When you design, you can view the original spooled file and the resulting spooled file on the right. Select the ‘Spool’ view to see the original spooled file. Text, that has already been remapped or tabulated will be shown in grey:
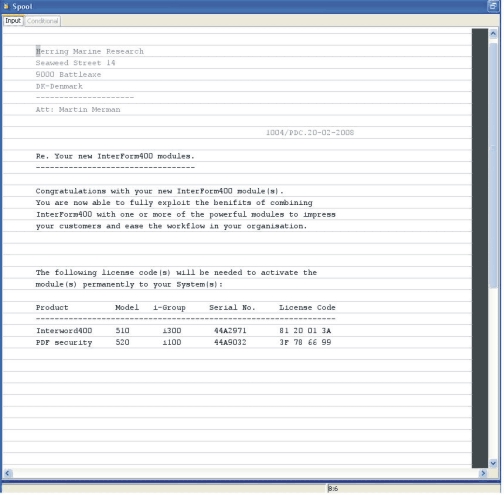
If the mouse pointer is placed in the spool view the current position is shown in the bottom to the right. Above the current position is position 8 in line 6. If you mark a conditional element the 'Conditional' tab will light up - making it possible to view the lines transferred to the specific overlay by activating this tab. You can use the conditional tab to define tabulators and remap windows in the conditioned overlay.
The Result view
The result view looks like this:
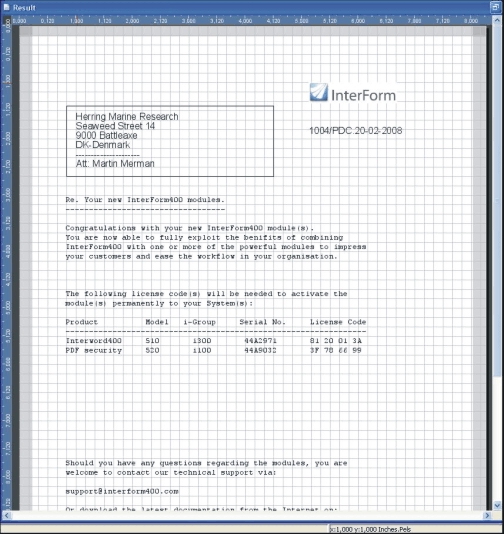
Please note, that the rulers are only displayed with the grid. You can mark an element and drag it to the position you want. The current position of the mouse pointer is shown in the bottom in inches and pels.
When you have finished the design you need to upload/save onto the InterForm400 databases on your System i. You can do that in these manners:
Save the current overlay:

Select this icon to close the current overlay:

The designer will then ask if you want to save the current design (you are not offered the possibility to save as a different name). This is the same as ‘File’ and ‘Close current overlay’.
- Or select ‘File’ and ‘Save’/ ‘Save As’.