Installation of InterFormNG2 on the IBM i platform is described below.
Please notice the prerequisites - especially for OS400 and Java.
You can also view this video:
Please refer to Spool2XML for details regarding use of InterFormNG2 on the IBM i platform. Normal spooled file support is also available.
Prerequisites
The full prerequisites are listed in the prerequisites section.
To install InterFormNG2 on the IBM i platform you need this:
•OS400 version must be V7R4 or higher to run the latest version of InterFormNG2 as Java 17 is required.
•Java 8 (64 bit) must be installed for running older versions of InterFormNG2. Here you can see, on which OS400 versions, Java 8 can run: https://www.ibm.com/support/pages/node/686083
•It is highly recommended to install the latest version of Java.
•As default InterFormNG2 will use the 64 bit version of Java . This is setup in the data area, IFORMNG2/JAVA_HOME. You can change that to point to newer/higher version in the future by changing the contents of this data area. The default value is: /QOpenSys/QIBM/ProdData/JavaVM/jdk80/64bit. You can also set that up via option 92. NG2 installation and configuration on the IFORMNG2/IFORMNG2 command.
•InterFormNG2 are running the jobs under a fixed user profile, which is the user profile, IFORMNG2. You can also connect to the IBM i via another user profile setup on the Global system settings. It is highly recommended to setup both user profiles, so that the password does not expire.
Installation/Upgrade on the IBM i platform
If you upgrade to version 3.5.0 from a previous version, then you need to:
1) Copy extra .jar files such as database drivers, were placed in $JAVA_HOME\jre\lib\ext. If you have added one or more .jar files to this folder, then before installing the new version, then copy those jars to /IFormNG2/InterFormNG-shell/Core/libext (do not copy the ones that are there by default in Java 8, only the ones you have added).
2) After the upgrade you can change the JAVA_HOME environment variable to point to Java 17 runtime. That can set via the data area, IFORMNG2/JAVA_HOME or via the IFORMNG2/IFORMNG2 command and option 92. NG2 installation and configuration.
To install InterFormNG2 on the IBM i platform you need to be signed on as a user profile with QSECOFR security. At least these special authorities must be included on the user profile:
*IOCFGSYS
*ALLOBJ
*JOBCTL
*SECADM
*SPLCTL
Spool2XML and InterFormNG2 for IBM i is shipped as a save file named InterFormNG2_IBMi.LIBF.
The save file contains the library, IFORMNG2NE.
The first step of either an install or upgrade is to restore the IFORMNG2NE library from the save file.
The easiest way to upload and restore the library is to use a small program which you can run on your PC.
A prerequisite for this is however, that the FTP server is running on the IBM i. An alternative, that does not require FTP is listed below.
You can download this program via this link:
http://downloads.interform400.com:18080/axs/a:/shares/SW/RSTLIBPC.exe
A prerequisite is, that port 20 and port 21 are open in any firewalls between the client and the IBM i.
In order to start uploading you can double click on the RSTLIBPC.exe file (Java is required). This window will then appear:
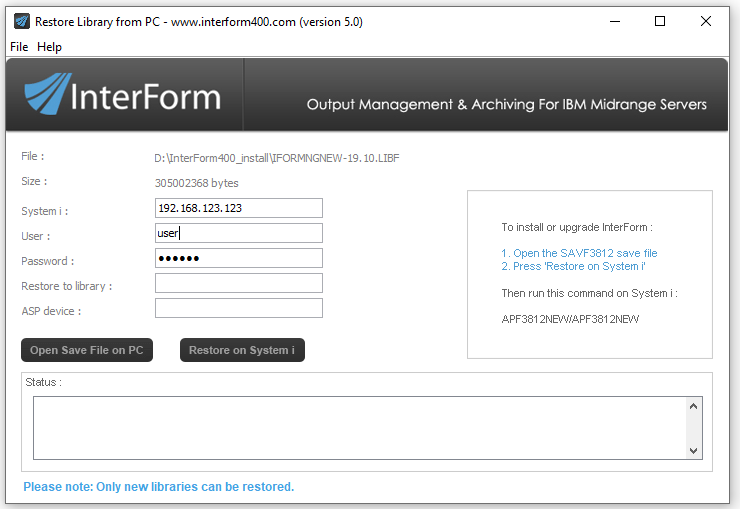
In the screen above you enter the System i identification i.e. IP-address or server name and a user ID and password used for signing on to the System i. Now select the save file to upload (called e.g. InterFormNG2_IBMi.LIBF) via the icon Open Save File on PC.
Now click Restore to System i, and then the save file will be restored to the default library, IFORMNG2NE.
(You can type in the library, IFORMNG2NE in the Restore to library field above, but you can just keep it blank to use the default IFORMNG2NE library).
iASP instructions
If you want/need to move InterFormNG2 to an iASP, then you should consult the section, Installing InterFormNG2 in an iASP.
Alternative restore without FTP
There is an alternative to the RSTLIBPC tool, that is mentioned above. If the FTP server is not running on the IBM i, then you can instead copy the installation file to a directory in the IFS and then restore the installation library from that.
If you e.g. have received the InterFormNG2 distribution for IBM i as the save file: InterFormNG2_IBMi.LIBF, then you can e.g. upload it to a directory called MyDir.
Next you need to create a save file into which you can copy the save file from the IFS.
You can e.g. use this command to create a temporary save file in QTEMP: CRTSAVF QTEMP/IFORMNG2NE
Now you can do a binary copy of received the save file in the IFS into the temporary save file in QTEMP:
CPYFRMSTMF FROMSTMF('/MyDir/InterFormNG2_IBMi.LIBF') TOMBR('/qsys.lib/qtemp.lib/iformng2ne.file') MBROPT(*REPLACE) CVTDTA(*NONE)
Now you can restore the installation library, IFORMNG2NE from the save file in QTEMP with this command:
RSTLIB SAVLIB(IFORMNG2NE) DEV(*SAVF) SAVF(QTEMP/IFORMNG2NE)
After that you can continue with the upgrade/install as described below.
Starting the install/upgrade
If InterFormNG2 is already installed, then you need to stop the IFORMNG2 subsystem in either of these ways before you go ahead with an upgrade:
1.With the command: ENDSBS SBS(IFORMNG2)
2.Or with the command: IFORMNG2/IFORMNG2 and option 11. End IFORMNG2 subsystem.
After the new installation library has been restored, you run this command to do either a new install or upgrade:
IFORMNG2NE/NG2INSTALL.
The NG2INSTALL command has this parameter:
WEBPORT
The port number to use for the web service in InterFormNG2. Default port (*DFT) is 8086. You should verify that the selected port number is not used on the IBM i before proceeding.
This command will either do a new install or upgrade depending on if an existing IFORMNG2 library was found or not.
The upgrade will respond with the message ‘InterFormNG2 upgraded successfully.’, when an upgrade is finished.
It is recommended to ensure, that the IFORMNG2/IFORMNG2 subsystem is started automatically during IPL. Such an automatic start should be inserted as one of the last commands in the program referenced in the system value, QSTRUPPGM. At best a MONMSG CPF0000 should also be added after the start of this subsystem. Please refer to your system administrator or InterForm support for more details.
After installing Spool2XML and InterFormNG you should go into the IformNG2 main menu with this command:
IFORMNG2/IFORMNG2.
After the installation/upgrade
Remember to start the IFORMNG2/IFORMNG2 subsystem.
Old work files are automatically deleted as covered in this section: purge/clean up of old temporary work files. You can even configure how often this purge is run. As default it is every 60 minutes.
Please notice, that as a part of the installation a user profile, IFORMNG2 is created. This user is created with a long, randomized and encrypted password and all processing in InterFormNG2 is run under this profile, so it is important, that the user profile is unchanged in order to prevent problems during processing.
If you have done an upgrade the old version is kept:
The previous IFORMNG2 library is renamed into IF.xxxx, where xxx is the old version of the IFORMNG2 library. The previous directory, /IformNG2/InterFormNG-shell is after the upgrade renamed into /Iformng2/InterFormNG-shell-xx.xx, where xx.xx is the old version.
After a while (making sure that the upgrade went fine and all is running as expected), you can delete the old library and the old directory from the IFS.
Please note: It is - like other InterForm software - NOT recommended to include the IFORMNG2 library in the library lists of jobs - especially not the system library list to avoid any
locks of the library when an upgrade is done.
If the NG2SERVER job in the IFORMNG2 subsystem does not start or starts and immediately stops, then you should consider to check this section: NG2SERVER job does not start.
Roll back an upgrade on IBM i
If you have done an upgrade of InterFormNG2 on the IBM i platform and shortly after find out, that you want to roll back to the old version, then you can roll back to the old version (for some upgrades this is not possible e.g. if resources are changed after the upgrade, then unpredictable results might be seen....). The steps to follow in order to roll back an upgrade are these:
1) Stop the subsystem, IFORMNG2/IFORMNG2 e.g. via option 11. End IFORMNG2 subsystem on the menu IFORMNG2/IFORMNG2.
2) In the IFS you should be able to find these folders:
/iformng2/InterFormNG-shell/Core and /iformng2/InterFormNG-shell/Core.Backup.yyyy-MM-dd hh.mm.ss, where yyyy-MM-dd hh.mm.ss is the time stamp of the upgrade.
Rename the folder, /iformng2/InterFormNG-shell/Core into something else e.g. /iformng2/InterFormNG-shell/Core.Error and
Rename the folder, /iformng2/InterFormNG-shell/Core.Backup.yyyy-MM-dd hh.mm.ss into /iformng2/InterFormNG-shell/Core
3) In the IFS you should also be able to find these folders:
/iformng2/lib and /iformng2/lib.Backup.yyyy-MM-dd hh.mm.ss, where yyyy-MM-dd hh.mm.ss is the time stamp of the upgrade.
Rename the folder, /iformng2/lib into something else e.g. /iformng2/lib.Error
Rename the folder, /iformng2/lib.Backup.yyyy-MM-dd hh.mm.ss into /iformng2/lib
4) You should be able to find these libraries:
IFORMNG2 and IF.x.x.x, where x.x.x is the version, that you upgraded from.
Rename the library, IFORMNG2 into something else e.g. IFORMNG2EE.
Rename the library, IF.x.x.x into IFORMNG2.
5) Now you can start the IFORMNG2 subsystem again e.g. via option 10. Start IFORMNG2 subsystem on the menu IFORMNG2/IFORMNG2.
6) Optional clean up:
Now the roll back is done, and you can consider to delete these folders, when you are 100% sure, that InterFormNG2 is running fine after the roll back:
Delete the folders: /iformng2/InterFormNG-shell/Core.Error and /iformng2/lib.Error.
Delete the library: IFORMNG2EE
Configure the InterFormNG2 Java environment
You can configure the InterFormNG2 Java environment from the IFORMNG2/IFORMNG2 menu, if you select option 92. Change NG2 installation:
Configure IFORMNG2 Startup (NG2SETUP)
Type choices, press Enter.
IBM I Queue Monitor . . . . . . > *ACTIVE *ACTIVE, *INACTIVE, *SAME NG2-Server (Output generator) . > *ACTIVE *ACTIVE, *INACTIVE, *SAME CommandLine to NG2 . . . . . . . > *ACTIVE *ACTIVE, *INACTIVE, *SAME QIBM_QSH_CMD_OUTPUT - *JOB . . . > NONE
JAVA_HOME Blank=System default > '/QOpenSys/QIBM/ProdData/JavaVM/jdk80/64bit'
________ JVM_MEMORY . . . . . . . . . . . > '-Xms2g -Xmn1g -Xmx3g' Use jt400Native.jar . . . . . . > '-Dloader.path=/QIBM/ProdData/OS400/jt400/li b/jt400Native.jar'
JVM custom options . . . . . . . > ' '
More... F3=Exit F4=Prompt F5=Refresh F12=Cancel F13=How to use this display F24=More keys
|
The options on the screen above are:
Note: For the Java configuration you need to be 100% sure, that you write the values in the right case as they are all case sensitive.
For JAVA_HOME, JVM_MEMORY and Use jt400Native.jar parameters you can specify *DEFAULT to revert back to the default, shipped values.
IBM I Queue Monitor
This is the output queue monitor, that is used by the module, Spool2XML. If you are not using Spool2XML, then you should set this to *INACTIVE.
NG2-Server (Output generator)
This specifies, if you want to start the InterFormNG2 core. This should normally be set to *ACTIVE, unless you are connecting to the IBM i from another platform.
CommandLine to NG2
If you are (or intend to) using the NG2CMD to call InterFormNG2 from an iSeries program, then you should set this to *ACTIVE to enable this feature.
QIBM_QSH_CMD_OUTPUT - *JOB
With the default value of NONE no extra Java log is generated, but you can also here state the value of the environment variable, QIBM_QSH_CMD_OUTPUT for the InterFormNG2 related jobs and here e.g. specify a target file in the IFS.
JAVA_HOME Blank=System default
This sets the value of the Java_home environment variable and thereby selects which Java version, that InterFormNG2 should use. A new installation is shipped with the value, /QOpenSys/QIBM/ProdData/JavaVM/jdk80/64bit, which is recommended. This makes InterFormNG2 use the 64bit version of Java 8.
JVM_MEMORY
This sets the memory use of InterFormNG2. -Xms2g set the initial heap size to 2Gb, -Xmn1g sets the heap size of temporary objects to 1Gb and -Xmx3g sets the maximum size of the memory allocation pool.
Use jt400Native.jar
This should specify the IFS location of the jt400Native.jar file. You can clear this to avoid using this file, if the file is not good enough as mention in this section.
JVM custom options
Here you can setup extra Java configuration of your choice. A few examples/suggestions:
-Dcom.ibm.cacheLocalHost=true
This will cache the IP-address of the IBM i instead of getting this information each time the IP-address is required. The downside is, that you will need to restart the InterFormNG2 service, if the IP-address has been changed.
-Dcom.ibm.crypto.provider.doAESInHardware
This enables hardware encoding instead of software. This should speed up some encryption jobs.
-Xquickstart
This will make the InterFormNG2 server start around 25% faster, but the downside is, that processing of files will be a bit slower. So you should not used this for production machines, but consider this for test machines, where the service is often restarted and not processing a lot of files.
Log of the NG2SERVER job
The NG2SERVER job is the job, that runs the core InterFormNG2 application on the AS400/iSeries/IBM i platform. If there is a problem with Java or if the java settings are not supported by the java version installed, then the NG2SERVER job will stop without a warning and without a joblog to explain, what the problem is.
You can however force the NG2SERVER job to generate a log, if you create (or change) the value of the data area, IFORMNG2/NGSTDOUT. If the data area does not exist, you can create it with this command:
CRTDTAARA DTAARA(IFORMNG2/NGSTDOUT) TYPE(*CHAR) LEN(6) VALUE('NONE')
The value of this data area affects the log output of the java.
You can set a new value of this data area with the command:
CHGDTAARA DTAARA(IFORMNG2/NGSTDOUT) VALUE('NONE')
Possible values are:
NONE
No log is generated - Default.
STDOUT
A SPLF is generated using QPRINT. Notice, that the downside is, that this will keep the output spooled file open while the job is running and may collide with any backups.
FILE
Log is output into the IFS stream file: /IFORMNG2/StdOut.log.
The authority of InterFormNG2 on the AS400 platform
The authority of InterFormNG2 is based on the user profile, IFORMNG2. The user profile, IFORMNG2 is running the InterFormNG2 jobs, so this user profile need to have access to the objects, that you want to access in InterFormNG2.
You can e.g. consider to add a group profile to the IFORMNG2 user profile, that provides the required authority.
Sign on for the first time
Before starting the InterFormNG2 processor you should consider what port number to use, when accessing InterFormNG2. The default port number is 8086, so that you can access InterFormNG2 locally via either:
https://127.0.0.1:8086 or http://127.0.0.1:8086 - depending on if you have activated https or http.
(Change 127.0.0.1 to the IP-address or network name of the IBM i).
Here you can sign on for the first time. You might need to wait a few minutes for the InterFormNG2 service to be fully started. You can see that on the active jobs of the IFORMNG2 subsystem: You should be able to sign on, when the jobs are idle.
After applying a valid license to InterFormNG2 you need to restart the IFORMNG2 subsystem to enable document processing in InterFormNG2.
Ensure delete of old job log entries on the IBM i platform
We have found an issue in older versions of InterFormNG2, where unfortunately old job logs are not deleted even though the setting indicates, that this is the case.
You can see the problem in two ways:
1) When you look into the job logs, then you can see entries that are older than the limit specified in the job log settings for the tenant.
2) You can also look into this directory in the IFS: /iformng2/InterFormNG-shell/user/profiles/default/logs/ng2LogDB. Inside of that you will find a directory called default and also one extra directory for each of the tenants, that are defined e.g. the home tenant. If the size of the home (and similar) folders is very large, then this is also an indication, that old job logs are not deleted as they should be.
You can push InterFormNG2 into purging old job logs, if you go into job log settings for the tenant and here state a different number of days to keep the job logs, click save and then change it back. Then you should notice, that older job logs disappear when you look into the job logs. When many job logs has been deleted you can then reduce the size of the folder, if you go into job log settings for the tenant and here run the option, Compress log database now. This option should only be run while no processing is done in the workflow.
One drastic alternative is to delete all job logs for a tenant. If you want to do that, then you first need to end the IFORMNG2 subsystem and then delete the folder for the tenant e.g.
/iformng2/InterFormNG-shell/user/profiles/default/logs/ng2LogDB/home
Then you can start the IFORMNG2 subsystem again.