Overlay elements
The overlay elements are:
Up to 9999 overlay elements can be made in one overlay.
This section describes the elements in the green screen designer. The graphical designer is also an alternative.
1=FRAME
Seqnbr. Type Inch.pel Repetition 11,0 1 Frame Top edge ______ Move right ______ Left edge ______ Move down ______ Right edge ______ Extra times ___ Bottom edge ______ Thickness in pels ___ NW NE SW SE Round/Sharp (R S) _ Radius __ __ __ __ Pattern _ F4=List
F3=Exit F11 = delete F12=Cancel F18=View Spool entry
|
Top Edge
Inches, pels absolute to the upper edge of a portrait page regardless of the rotation specified by the global settings for the overlay.
Left Edge
Inches, pels absolute to the left edge of a portrait page regardless of the rotation specified by the global settings for the overlay.
Right Edge
Inches, pels absolute to the left edge of a portrait page regardless of the rotation specified by the global settings for the overlay.
Bottom Edge
Inches, pels absolute to the upper edge of a portrait page regardless of the rotation specified by the global settings for the overlay.
Thickness in pels
Thickness of a border in pels (1/240"). Zero means no border.
Round/Sharp
Determines whether the corners of the frame will be round or sharp. You can also specify the radius in pels of each of the 4 corners (NorthWest, NorthEast, SouthWest, SouthEast).
You can mix sharp and round corners by entering a radius in pels for the corners you want round, and state zeros for the corners you want sharp.
If you specify R for round corners without entering radius in any of the 4 fields, the system will use the default value of 24 as radius for all 4 corners.
Pattern
Defines a fill pattern for the frame. Left blank means no pattern. Refer to the Ink element for information on how to use patterns.
Repetition
Move right
Inch,pels of the right movement of a duplicate of the frame relative to the value for left edge
Move Down
Inch,pels of the vertical movement of a duplicate of the frame relative to the value for Top edge
Extra times
Extra copies of the frame excluding the original. Extra copies will be displaced relative to each other according to the settings of Move right and Move Down.
NW: Radius in pels for the North West corner of the frame
NE: Radius in pels for the North East corner of the frame
SW: Radius in pels for the South West corner of the frame
SE: Radius in pels for the South East corner of the frame
Color Printing:
When working in a file-set defined for color printing, the frame definitions will offer an additional pattern setting for color print. When having selected a color INK setting prior to the frame settings, this color INK selection will then be used for the printed frame and pattern. Frames defined with Thickness in pels (if any), will always be printed as a solid line.
Seqnbr. Type Inch.pel Repetition 3.0 1 Frame Top edge ______ Move right _______ Left edge ______ Move down _______ Right edge ______ Extra times ___ Bottom edge ______ Thickness in pels __3 NW NE SW SE Round/Sharp (R S) S Radius __ __ __ __ Pattern, B/W-prt _ F4=List Pattern, color-prt B F4=List F3=Exit F4=Prompt F11=Delete F12=Cancel F13=Set view/print parameters F14=PCL-view
|
2=HORIZONTAL LINE
Seqnbr. Type Inch.pel Repetition 1 2 Horizontal line From top edge ______ Move right ______ Left end ______ Move down ______ Right end ______ Extra times ___
Thickness in pels ___
F3=Exit F12=Cancel F18=View Spool entry
|
From Top Edge
Inches, pels absolute to the upper edge of a portrait page regardless of the rotation specified by the global settings for the overlay.
Left end
Inches, pels absolute to the left edge of a portrait page regardless of the rotation specified by the global settings for the overlay.
Right end
Inches, pels absolute to the left edge of a portrait page regardless of the rotation specified by the global settings for the overlay.
Thickness in pels
Thickness of a line in pels (1/240"). Zero means no border.
Move right
Inch,pels of the right movement of a duplicate of the line relative to the value for left edge
Move Down
Inch,pels of the vertical movement of a duplicate of the line relative to the value for Top edge
Extra times
Extra copies of the line excluding the original. Extra copies will be displaced relative to each other according to the settings of Move right and Move Down.
3=VERTICAL LINE
Seqnbr. Type Inch.pel Repetition 1 3 Vertical line From top edge ______ Move right ______ From left ______ Move down ______ Lower end ______ Extra times ___
Thickness in pels ___
F3=Exit F12=Cancel F18=View Spool entry
|
From Top Edge
Inches, pels absolute to the upper edge of a portrait page regardless of the rotation specified by the global settings for the overlay.
From left
Inches, pels absolute to the left edge of a portrait page regardless of the rotation specified by the global settings for the overlay.
Lower end
Inches, pels absolute to the upper edge of a portrait page regardless of the rotation specified by the global settings for the overlay.
Thickness in pels
Thickness of a the line in pels (1/240"). Zero means no border.
Move right
Inch,pels of the right movement of a duplicate of the line relative to the value for left edge
Move Down
Inch,pels of the vertical movement of a duplicate of the line relative to the value for Top edge
Extra times
Extra copies of the line excluding the original. Extra copies will be displaced relative to each other according to the settings of Move right and Move Down.
4=LINE
Seqnbr. Type Inch.pel Repetition 1,0 2 Line Endpoint 1 from top ______ Move right ______ from left ______ Move down ______ Endpoint 2 from top ______ Extra times ___ from left ______ Thickness in pels ___
F3=Exit F12=Cancel F18=View Spool entry
|
This definition works similar to the two previous definitions. It distinguish itself by enabling lines to be diagonal. This also means you will have to define coordinates for each endpoint.
Endpoint 1
From Top: Inches, pels absolute to the top edge of the paper.
From left: Inches, pels absolute to the left edge of the paper.
Endpoint 2
From Top: Inches, pels absolute to the top edge of the paper.
From left: Inches, pels absolute to the left edge of the paper.
Thickness in pels
Thickness of a the line in pels (1/240"). Zero is accepted, but not recommended.
Move Right
Inch,pels of the right movement of a duplicate of the line relative to the value for left edge
Move Down
Inch,pels of the vertical movement of a duplicate of the line relative to the value for Top edge
Extra times
Extra copies of the line excluding the original. Extra copies will be displaced relative to each other according to the settings of Move right and Move Down.
If you are making horizontal and vertical lines, it is recommended that you use definition 2 and 3, and only use this definition for making diagonal lines.
5=TEXT
This can be used to insert text constants (and 1D barcodes) in the overlay.
(Please notice the similar, but more advanced text block element).
Seqnbr. Type Inch.pel 26,0 5 Text constant From top edge ______ From left _______ Adjustment _ (U C R +) Rotation ___ Font ____ F4=List Text _____________________________________ _________________________________________________________________________________ ______________________ + for longer text
F3=Exit F4=Prompt F12=Cancel F18=View Spool entry
|
From Top
Inches, pels absolute to the top edge of the rotation specified by the global settings for the overlay.
From left
Inches, pels absolute to the rotation specified by the global settings for the overlay.
Adjustment
Adjustment to use: U=Unadjusted, C=Centered, R=Right adjusted. If you select the special value, ‘+’, a small window will pop up giving you the possibility to underline the text constant.
Rotation
The available values for rotation are: 000, 030, 090, 120, 180, 210, 270, 300 degrees.
Font
The font ID of the formatted text. Please note, that 2D barcode font numbers are not supported for text constants. You need to use either a concat or remap window element for 2D barcodes.
Text
Text field. If you type a ‘+’ in the ‘for longer text’ field, you will be presented with a longer entry field, making it possible to enter a text field of up to 378 characters instead of the usual 128 characters.
6=Print-info (Print information)
Seqnbr. Type Inch.pel 1.0 6 Print-info From top edge ______ From left ______ Rotation ___ Font ___0 F4=List Info-type __________ F4=List
F3=Exit F4=Prompt F12=Cancel
|
From Top
Inches, pels absolute to the top edge of the rotation specified by the global settings for the overlay.
From left
Inches, pels absolute to the rotation specified by the global settings for the overlay.
Rotation
The available values for rotation are: 000, 090, 180, 270 degrees.
Font
The font ID used for printing out the information required below.
Info-type
Type of information to be printed (can be prompted with F4). Here you can specify to either print out page numbers or information about the job, that created the spool file.
Value |
Prints out |
*PAGNBR |
Page number of the actual page. |
*ENDPAGE |
Total number of pages. |
*MUPPAGNBR |
The actual page number when using Multi-Up. |
*JOBNAME |
The job name. |
*USER |
User profile used for the job. |
*JOBNBR |
Job number of the job. |
*JOB |
All information above, about the job. |
*PGM |
The program, that created the spool file. |
*PGMLIB |
Library of the program, that created the spool file. |
*OVERLAY |
The overlay, that has been merged with. |
*FILESET |
File set of the merged overlay. |
*PRTTXT |
The PRTTXT attribute of the merged spooled file. |
*SPLSTAMP |
The date and time of the spooled file in the format: YYYY-MM-DD HH:MM:SS. |
TIP: You can print out the text: ‘Page X out of Y’, where X is *PAGENBR and *ENDPAGE is Y. Place the text ‘Page out of ‘ using option 5=Text, and then place the two numbers using option 6=Print-info with *PAGENBR and another with *ENDPAGE.
7=INK (fill pattern for succeeding sequence lines)
Seqnbr. Type 1,0 7 Ink
Select ink for the succeeding lines Pattern 8 blank = unchanged, 0 = 100% white shading, 1-8 = 1-100% shading, ...
F3=Exit F12=Cancel F13=Set view/print parameters F14=PCL-view
|
Normally the system overwrites whatever might be the original contents, while leaving the background unaltered.
With this overlay element the Ink can be changed enabling printing white on black background, a pattern transparently on another pattern etc. The possibilities are numerous.
More examples for the use of Ink can be found here.
Pattern selection: |
Output pattern: |
0 |
100% white shading (erases background) |
1 |
2% shading |
2 |
10% shading |
3 |
20% shading |
4 |
35% shading |
5 |
55% shading |
6 |
80% shading |
7 |
99% shading |
8 |
100% shading |
A |
1% shading (600 DPI) |
B |
3% shading (600 DPI) |
C |
6% shading (600 DPI) |
D |
8% shading (600 DPI) |
E |
24% shading (600 DPI) |
- |
Horizontal lines |
! |
Vertical lines |
/ |
Diagonal lines (to the right) |
\ |
Diagonal lines (to the left) |
+ |
Horizontal and vertical lines |
X |
Crossing diagonal lines |
Examples on use of Ink:
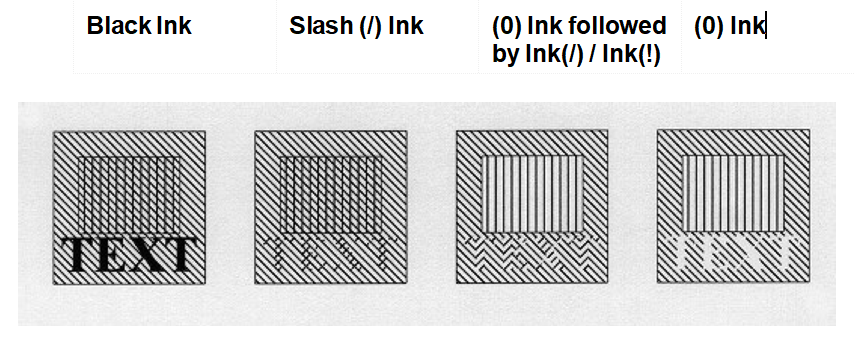
We have first made four large frames with fill pattern"\" (diagonal stripes \\\).
In the sequence lines after, we have defined 4 small frames with fill pattern "!" (vertical stripes |||) and 4 text constants printed with font 2103, which fits in the large frames.
In frame 1 and 2 we state an Ink just before the text line. You will notice, that the pattern of the elements are placed on top of the previous placed elements.
If you want the small frame and text to be shown without the lines of the larger frame you could choose to first place the same frame and text with fill pattern 0 (erase background) before reprinting it with the wanted Ink as seen in frame 3. Here ‘!’ is used for the small frame and ‘/’ is used for the text.
Frame 4 shows the result when choosing pattern = 0 (erase background) for the Ink and printing TEXT.
You can also insert an image as a watermark, if you change the ink to be shading . Note however, that you cannot use Ink to change PCL files into watermarks.
Color Printing:
When working in a file-set defined for color printing the INK settings will have additional options, as per below.
Any RGB (Red Green Blue) combination of color can be defined via the Work with Palette option.
Seqnbr. Type 2.0 7 Ink
Select ink for the succeeding lines Pattern, B/W-prt _ blank = unchanged, 0 = 100% white shading, 1-8 = 1-100% shading, ... Pattern, color-prt 8 (See above) Color 3 1=Black, 2=Grey, 3=Red, .. F3=Exit F4=Prompt F11=Delete F12=Cancel F13=Set view/print parameters F14=PCL-view
|
This enables printing of spool data, text constants, lines and frames in color on PCL compatible color laser printers.
TROUBLE SHOOTING: Remember to select a color printer type when printing to a PCL compatible color laser printer (HP4500 or HP4500D)
NOTE: Ink commands in main overlays will have not effect in conditioned sub-overlays.
8=TABULATOR (Paragraph tabulation)
A "tabulator" performs formatting and horizontal movement of an interval of lines in the spool date. Almost the same result can be obtained by using command type 9. Remap Window.
The line and position numbers to be entered are those appearing in the input, regardless of a general margin or extra blank lines defined for the overlay.
Seqnbr. Type 1 8 Tabulator Input: Line ___ - ___ Position ___ - ___ Print: From left edge ______ Adjustment _ (U L C R N B +) Font ____ F4=List Condition: Position ___ - ___ Is > = < N _ - ___________ Blank after _ B = Blank condition after More conditions (Y N) F3=Exit F4=Prompt F12=Cancel F18=View Spool entry
|
Input Line:
The line interval to read including both lines entered here.
Input Position:
The Column interval to read including both positions entered here
From left:
Inches, pels absolute to the rotation specified by the global settings for the overlay. If moved beyond the paper edge (e.g. 14") the data will be removed from the data stream. Note that the Left edge is measured from the physical paper edge unless the line interval of the Tabulator is included in an Extended Page Definition interval. In this case the Left Edge of the Tabulator is measured from the Left Margin defined in the Extended Page Definition.
Adjustment:
Formatting of the text field. The Valid values are:
U |
Un-formatted. The area is printed without any changes to formatting, and spaces. |
|
L |
Left-adjustment. Spaces proceeding the first character in text lines in the tabulator area are removed, causing the area to be left adjusted at the position indicated by From Left. |
|
C |
Centred. Spaces within the tabulator area before and after text lines are being removed, and the area is centred around the position indicated by From Left. |
|
R |
Right-adjustment. Spaces following the character in text lines in the tabulator area are removed, causing the area to be right adjusted at the position indicated by From Left. |
|
N |
Numeric. Indicates if the text lines in the tabulator area should be considered as numbers (amounts). |
|
B |
Print succeeding spaces in barcode data. Indicates if the spaces in the coloumn interval succeeding the barcode data should be converted to barcode. This only apply to the barcodes 128 and 3of9. The barcodes will always be left-adjusted. (Normally succeeding spaces will be ignored. |
|
+ |
Opens up for Extended Adjustement for definition of Underline of text in the tabulator and/or lines of periods (known as punctuation or dot leaders) made after each line of the tabulator. The following options appear when + is entered: Adjustment: The adjustement of the underlined or punctuated lines. Values U, L, C, R or N acording to the above Underline: Underlining of text in the tabulator (spaces are not underlined). Punctuation length: If the last position of a line in the tabulator, defined by the second Input Position field, is a period sign, a line of punctuation will be printed. The punctuation will start after the last printable character, and end at the position (inches,pels) stated in this field counting from the position stated in From Left. Only Adjustment values U and L can be used. No punctuation will be made if other values are used, if no period sign is found or if the text exceeds the punctuation length. |
Font:
The new font of the formatted text.
Condition:
An optional set of values used if the tabulator should be executed on a certain condition.
Position
Only activate the tabulator, if a character string in the interval of lines defined by the tabulator matches this character string according to the following condition.
Is >=<N
Only run tabulator, if this following field contains a text string or a number which match one of the following valid operators:
> |
Greater than a number entered in the following field |
|
= |
Equal to a number or a text string (case sensitive) or a number entered in the following field. |
|
< |
Less than a number entered in the following field |
|
N |
Not equal to a number or a text string (case sensitive) or a number entered in the following field. |
|
A |
Acceptable characters. All the characters in marked interval must be one of the characters in the following field. |
|
U |
Unacceptable characters. Opposite of A: At least one character in the spooled file selection is not found in the specified list of characters. |
Blank After:
Stating B will remove the text string or the number which has been used for the condition from the resulting print out. A better alternative is to tabulate the conditioned text e.g. in another tabulator.
With this option you can tell InterForm400 to only remap the line if multiple conditions are true for the current line.
With the Tabulator the function is relevant for displaying the spool entry in order to determine lines and columns for the tabulator. F18 prompts the command DSPSPLF with the job information used for merge in option 3. Merge spool entry with overlay. Pressing F18 will only work if this merge has been done prior to entering this menu. You can also use F19 to view the spooled file as explained here.
WARNING: If two or more overlapping tabulators are defined the first defined will take the text it needs and leave blank positions in the relevant place for the next tabulator. A maximum of 200 tabulators per overlay can be defined. The limit of 200 includes any referenced suboverlays. If you are using many conditioned tabulators you should consider to use the conditioned overlay instead.
TIP:You can use a tabulator (left or unadjusted) to delete areas of text. Just tabulate the area over the edge of the paper (e.g. 14"). This will not produce unnecessary code in the data stream. InterForm400® detects if the code is defined to be printed outside the printable area, and will then just ignore it. In case you have made many re-mappings you can define a tabulator as the last sequence line which takes an area from line 1 to 72 and position 1 to 132, and move it outside the page, thereby deleting any remaining data.Extended Adjustment (+) does not support fixed width fonts e.g. Courier.
TIP: You can align numbers, where some are negative by use of numeric adjustment (N). See below.
WARNING: Adjustment cannot place the adjusted text to the left of the left edge of the paper in PCL output (negative positioning is not possible). So if you try to e.g. right adjust a long text, that cannot fit in between the left edge of the paper and the specified position the text is moved to the right to make room for all the text.
Input data is formatted for fixed pitch font tabulation
0 1 2
1234567890123456789012345
1 MICKEY MOUSE 1.100,00
2 refund EARS -2.100,00
3 total 1.000,00-
If the above was uncritically printed with a proportional spaced font we would experience the result displayed below on the left, due to varying width of characters in the font.
If we made a tabulator that defined column 16 to 25 of line 1 to 3 to be printed with numeric adjustment, we would get the result displayed to the right. Notice that the minus is compensated for in the right alignment.
Proportional font without tabulator
MICKEY MOUSE 1.100,00
refund EARS -2.100,00
total 1.000,00-
Proportional font with a numerical adjusted tabulator
MICKEY MOUSE |
1.100,00 |
|
refund EARS |
-2.100,00 |
|
total |
1.000,00- |
9=REMAP WINDOW (re-mapping text areas)
Definition of a Remap Window gives you the possibility of taking a particular part of a given text line and print it elsewhere on the page, e.g. with rotation and another font.
A maximum of 300 Remap Window lines are allowed in one overlay. The limit of 300 includes the remaps in any referenced suboverlay. Additional remap window lines are ignored. If this limitation is a problem you should use 'If..Then' lines instead to create overlays, that are more efficient and easier to maintain. Contact your local InterForm400 contact to get more information of how to do that, if in doubt.
Seqnbr. Type 1 9 Remap window Input line ___ - ___ Position ___ - ___ Print: From upper edge ______ Line spacing . . ___ From left edge ______ Ignore blank lines _ (Y N) Adjustment _ (U L R C N B E +) Rotation ___ Font ____ F4=List Blank original _ B = blank original version Condition: Position ___ - ___ Is > = < N _ ____________________________ Blank after _ B = Blank condition after More conditions N (Y N)
|
Input Line:
The line interval to read including both lines entered here. If the end line is left blank or the same as the begin line, only one line will be remapped.
Position:
The Column interval to read including both positions entered here. The maximum position interval is 198 characters.
Upper edge:
Inches, pels absolute to the upper edge of the page according to the rotation specified by the global settings for the overlay.
From left edge:
Inches, pels absolute to the left edge of the page according the rotation specified by the global settings for the overlay.
Line Spacing
Measured in n/240" which means 6 lines per inch will give the value 40. Failure to fill in this value, will default to a linespacing of zero resulting all text to be printed in one line.
Ignore blank lines:
Enabling this option will cause all blank lines (and spooled file lines not fitting the conditions - if used) to be discarded.
Adjustment:
Formatting of the character string. Valid values are:
U |
Un-formatted. The character string is printed without any changes to formatting, and spaces. |
|
L |
Left-adjustment. Spaces proceeding the first character in the character string are removed, causing the string to be left adjusted at the position indicated by From left. |
|
C |
Centred. Spaces within the character string before and after printable characters are being removed, and the string is centred around the position indicated by From left. |
|
R |
Right-adjustment. Spaces following the character in the character string are removed, causing the string to be right adjusted at the position indicated by From left. |
|
N |
Numeric. Indicates if the characters in the character string should be considered as numbers (amounts). |
|
B |
Print succeeding spaces in barcode data. Indicates if the spaces in the coloumn interval succeeding the barcode data should converted to barcode. This only apply to the barcodes 128 and 3 of 9. The barcodes will always be left-adjusted. |
|
Block formatting. (aligning both left and right margins). This function enables changes to the number of letters per line, based on the font size and the max. line width of the justification. Distance between words is automatically adjusted. Maximum line width: The maximum width available for the text. InterForm400 moves words or individual characters (if there is not enough room for the whole word on a line, then the words will be divided - without a syllable test) to the next line to fit within the maximum width. Right margin adjustment: Defines when a text line should fully justified. This is based on the percentage of text characters versus blank spaces left on the last line of a remapped paragraph.(0-100%). If the output text takes up more than the given percentage, then the output line will be fully justified. If you set this to 100 (recommended), then no lines will be fully justified. Escape sequences: Used when working with spool files having escape sequences integrated. Note: For ZPL and IPL output the block function is limited to changing line breaks to fit a certain max width as well as setting a justification. Full justify is not supported for IPL output. |
||
+ |
Opens up for Extended Adjustment for definition of Underline of text in the Remap Window and/or a line of periods (known as punctuation or dot leaders) made after the text. following options appear when + is entered: Adjustment: The adjustment of the underlined or punctuation lines. Values U, L, C, R or N according to the above. Underline: Underlining of text in the Remap Window (spaces are not underlined). Punctuation length: If the last position of the text line in the Remap Window, defined by the second Input Position field, is a period sign, a line of punctuation will be printed. The punctuation will start after the last printable character, and end at the position (inches,pels) stated in this field counting from the position stated in From Left. Only Adjustment values U and L can be used. No punctuation will be made if other values are used, if no period sign is found or if the text exceeds the punctuation length. |
WARNING: Adjustment cannot place the adjusted text to the left of the left edge of the paper in PCL output (negative positioning is not possible). So if you try to e.g. right adjust a long text, that cannot fit in between the left edge of the paper and the specified position the text is moved to the right to make room for all the text.
Font:
The new font of the formatted text.
Blank original
B specifies, that the original text should be removed.
Condition:
An optional set of values used if the remapping should be executed on a certain condition.
Position:
Only activate the Remap Window If the character string read by the Remap Window matches this character string according to the following condition:
Is >=<N:
Only run tabulator if this following field contains a text string or a number which match one of the following valid operators:
> |
Greater than a number entered in the following field. |
|
= |
Equal to a number or a text string (case sensitive) or a number entered in the following field. |
|
< |
Less than a number entered in the following field. |
|
N |
Not equal to a number or a text string (case sensitive) or a number entered in the following field. |
|
A |
Acceptable characters. All the characters in marked interval must be one of the characters in the following field. |
|
U |
Unacceptable characters. None of the characters in the marked interval must be one of the characters in the following field. |
Blank after:
Stating B will remove the text string or the number which has been used for the condition from the resulting print out. A better alternative is to remove the condition with a tabulator.
With this option you can tell InterForm400 to only remap the line if multiple conditions are true for the current line.
TIP: If you specify B for Blank original above, the text removed cannot be used for any conditions (If..Then). If you want to combine the two, then do not blank the original in the remap. Instead insert an additional line tabulating (type=8) the unwanted text outside the page e.g. 14 inches from the left..
WARNING: Extended Adjustment (+) and Full Adjustment (E) does not support fixed width fonts e.g. Courier.
WARNING: Even though you can remap text out of the visible paper, the text is still possible to find the resulting PDF file when you merge with a spooled file. If you want to eliminate that possibility use an unadjusted tabulator to remove the spooled file text.
TIP: If you want to compare a column of numbers (Right justified) to a specific value using ‘<‘ or ‘>’ and want to condition a ‘Tabulator’, ’Remap’ or ‘If..Then’ on the result, you should include a space in front of the number, that you compare with. This compare will work fine also for large numbers, that are much wider than the compared value. (Reason: A space (‘ ’) has a lower value than all digits ‘0'-‘9'.)
Example for remap window: Cut text at specific length
It is possible to cut off a text mapped from the input spooled file to a specific length if you setup the remap window as shown below as described below.
The cut option is available for PCL/PDF file sets only.
The section below describes the setup for the green screen designer. A similar section for the graphical designer is found here.
The prerequisites are:
1.You should only remap a single spooled file line at a time (as subsequent lines are ignored).
2.You need to select Extended adjustment for the Remap Window element.
3.You need to set the Line spacing of the Remap Window element to 0.
4.You set the length for cut off as the Maximum line width on the Remap Window element.
An example is shown below for the Demo spooled file:
Design InterForm400 overlay APF300D
Overlay name: REMAP_CUT Overlay text: Seqnbr. Type Overlay definition 0001 9 Remap window 6 pos 8-40 top 1,000 left 5,120E font 6111
Seqnbr. Type 1,0 9 Remap window Input line 6 - 6 Position 8 - 40 Print: From upper edge 1,000 Line spacing . . 0 From left edge 5,120 Ignore blank lines N (Y N) Adjustment E (U L R C N B E +) Rotation 000 Font 6111 F4=List Blank original B = blank original version Condition: Position - Is > = < N A U Blank after B = Blank condition after F11=Delete More conditions N (Y N)
|
1. We remap a single line - in this case line 6, that contains the company name.
2. Extended adjustment is selected as Adjustment.
3. The Line spacing is set to 0.
Hit Enter to see the next screen:
Block formatting using escape sequences
Maximum line width . . . . . 0,094 Inches.pels, 0=No wrap Right margin adjust . . . . 100 0-100% Escape sequences: Start underline . . . . . ESC sequence End underline . . . . . . ESC sequence Conditional hyphen . . . . ESC sequence New line . . . . . . . . . ^NL ESC sequence Half line up . . . . . . . ESC sequence Half line down . . . . . . ESC sequence End half line up/down . . ESC sequence Reset font . . . . . . . . ESC sequence Font changes: ^F1 5006 ^F2 5008 ^F3 5010 ESC sequence ^F4 5011 ^F5 5012 ^F6 5013 followed by ^F7 5014 ^F8 5015 ^F9 5016 font number Color changes: ^C1 001 ^C2 002 ^C3 003 ESC sequence ^C4 004 ^C5 005 ^C6 006 followed by F3=Exit F4=List F12=Cancel color number
|
4. Above the Maximum line width is set to 0.094 pels (equal to 1 cm or 0.4 inches).
The result view in the designer might show a mess of letters placed on top of each other, but you can verify the final result with a preview:

So as you can see, InterForm400 is limiting the text to the available size as expected.
Example for the remap window with block (E) adjustment:
If you select adjustment=E for a remap window, you will be prompted for the information below:
Block formatting using escape sequences
Maximum line width . . . . . 3,000 Inches.pels, 0=No wrap Right margin adjust . . . . 90 0-100% Escape sequences: Start underline . . . . . ESC sequence End underline . . . . . . ESC sequence Conditional hyphen . . . . ESC sequence New line . . . . . . . . . ^NL ESC sequence Half line up . . . . . . . ESC sequence Half line down . . . . . . ESC sequence End half line up/down . . ESC sequence Reset font . . . . . . . . ESC sequence Font changes: ^F1 5006 ^F2 5008 ^F3 5010 ESC sequence ^F4 5011 ^F5 5012 ^F6 5013 followed by ^F7 5014 ^F8 5015 ^F9 5016 font number Color changes: ^C1 001 ^C2 002 ^C3 003 ESC sequence ^C4 004 ^C5 005 ^C6 006 followed by F3=Exit F4=List F12=Cancel color number
|
If you remap spooled file text like shown above, then the many special ‘escape’ sequences are searched for in the remapped text. If any of these ‘trigger texts’ are found, then the related command is executed instead and the ‘trigger text’ is removed from the output. Up to 16 escape sequences can be defined.
With the setup above this remapped text:
^F3^C3Red^C4Green^NL^C5Blue
You will get this text in font 5010:
RedGreen
Blue
With the texts Red,Green, Blue printed in the color of the text.
I=IMAGE
Seqnbr. Type Inch.pel 1 I Image From top edge ______ From left ______ Image name __________ Name, *NONE, *COLORIMG Reverse Image _ R = Reverse Image Resolution ___ 75,100,150,200,300,600 Color image Name, *NONE, *BWIMG Res-H Res-H
F4 = overview images F18=View Spool file
|
From top edge:
Inches, pels absolute to the upper edge of the page according to the rotation specified by the global settings for the overlay.
From left edge:
Inches, pels absolute to the left edge of the page according the rotation specified by the global settings for the overlay.
Image name:
The image imported under 5. Work with Images in the administration menu. *COLORIMG refers to the color image below and *BWIMG refers to the black/white image above.
Reverse Image:
Entering R here will cause the image to be printed in negative. This option is meant to reverse images to normal in relation to some scanning utilities which saves TIFF reversed. Note, that performance wise it is better to reverse if necessary during install of the image in InterForm400.
Resolution:
The resolution by which the image was scanned. This option can also be used to scale the image. For example an image scanned in 300 dpi can be scaled to double size in the print out by entering 150 here. Entering 600 here will cause the same image to be scaled to half size.
Color Printing:
When working in a file-set defined for color printing the Image settings will have an additional definition for color images. The resolution of the color image can be adjusted from the original settings, by stating an specific resolution for Horisontal and Vertical values, respectively. (1-600 DPI).
If the resolution settings are left blank, the original resolution settings of the imported image will be used.
The Black/White image definition is available to facilitate printing of the same overlay both on black and white and color laser printers.
WARNING: Note that you can not specify rotation. An image always has the orientation specified in the global settings for the overlay.
Special settings for Label overlays:
Image inserted in Label overlays cannot be scaled, but are simply printed in the resolution of the printer. So to find out the printed size of an image you need to divide the size of the image in dots/pixels with the resolution of the printer.
An image that is e.g. 450 dots by 300 dots will on a 200 DPI printer print as 2.25 inches by 1.50 inches. The same image used on a 300 DPI printer will print an image in size 1½ inches by 1 inches.
Label images can be rotated in the image element:
Seqnbr. Type Inch.pel 3,0 I Image From top edge 000001 From left 000001 Rotation 000 000, 090, 180, 270 Image 203 DPI DEMOIMAGE Name, *NONE Image 300 DPI DEMOIMG300 Name, *NONE
|
?=IF...THEN (conditional nesting of overlays)
This feature is useful in the situation where the appearance of the overlay has to be dependent of the text that is merged with the overlay. This can be caused by a spool entry containing two or more different print outs, say invoices and credit notes, and where you want different overlays on the individual printout.
Another use of the "If..then" feature is the case where a detail in the printout shall result in adding an extra detail to the overlay. Finally the If..then feature can be used for formatting print lines or groups of print lines appearing in random line positions.
Seqnbr. Type 1,0 ? If . . . . . Input line ___ - ___ Position ___ - ___ Is > = < N _ _________________________ Then . . . . Overlay __________ Nos. of lines to remap ____ Rotation ___ Upper edge ______ A/+/- _ Left edge ______ A/+/- _ Blank after _ B = blank original text More conditions Y (Y N)
F18=View Spool file
|
Input Line:
The line interval to read including both lines entered here.
Input Position:
The Column interval to read including both positions entered here.
Is >=<N:
Only call the sub-overlay if this following field contains a text string or a number which match one of the following valid operators:
> |
Greater than a number entered in the following field. |
|
= |
Equal to a number or a text string (case sensitive) or a number entered in the following field. |
|
< |
Less than a number entered in the following field. |
|
N |
Not equal to a number or a text string (case sensitive) or a number entered in the following field. |
|
A |
Acceptable characters. All the characters in marked interval must be one of the characters in the following field. |
|
U |
Unacceptable characters. None of the characters in the marked interval must be one of the characters in the following field. |
Overlay:
The name of the overlay to be used as sub-overlay. If the name entered here is MACROxxxxx where xxxxx represents a numeric number (e.g. MACRO00001) InterForm400® will make a PCL macro call using this number. This will require the PCL macro to be loaded into the printer prior to using the main overlay. The PCL file can be loaded into the printer by the InterForm400® HPMACRO command.
Number of lines to remap:
This parameter is used to pass on a line interval to a sub-overlay which can process the lines with Remap Windows or Tabulator commands. The first line of the interval will be the line defined by Input line of the line interval and will be regarded as line 1 in the sub-overlay, i.e. the sub-overlay will consider the interval as a virtual spool entry to process.
Defining *VAR for this function, will cause this If..then command to continue checking all lines starting from the beginning of the input line interval, until another If..then command is met, provided that it is within the line interval of the original If..then command. If conditions for more If..then commands are true concurrently, the field Lines to remap is only used from the last If..then command.
This feature is designed specifically to format item lines printed in varying lines, and with varying number of lines between the item groups.
Vertical cursor repositioning:
When you enter a number of lines to remap (other than 0) you are prompted for a vertical repositioning like below:
Vertical cursor repositioning before execute of sub overlay
Position related to actual position
Number of pels . . ( -99 - 99 )
Or reposition related to previous non blank input line
Number of pels . . ( 0 - 999 )
Or reposition after execute of suboverla related to highest Y-adress used in any remap window in sub-overlay.
Number of pels . . 40 ( 0 - 999 )
F3=Exit F12=Cancel
|
With this function you can vertically reposition the rest of the spooled file i.e. move the spooled file contents and all relatively positioned elements e.g. tabulators and remaps.
Position related to actual position:
This will move the rest of the spooled file up (negative value) or down (positive value).
Reposition related to previous non blank input line:
Use this repositioning e.g. in order to close the gap of blank lines on the original spooled file. (Use the If..Then scanning from the last non blank line.)
Reposition after execute of suboverlay:
The main benefit from this option is that if you are using an extended remap window in the suboverlay, then you can make the height of the suboverlay adaptive - to fit the text remapped lowest on the page, but this option can be used whenever the height of the suboverlay is uncertain.
Rotation:
Rotation of the conditioned overlay - available for New behaviour only. If the rotation is 000, the conditioned overlay is using the same rotation as the main overlay. If the rotation is different than 000, then the conditioned suboverlay is rotated - compared to the main overlay (anti clockwise rotation).
Upper edge:
Inches, pels position according to the entry of the following field:
A |
Vertical position of the sub-overlay is made absolute to the upper edge of the paper. Vertical positioning of elements in the sub-overlay is added to this value. |
|
+ |
The sub-overlay is re-positioned downwards relative to the position of the string matching the criteria for the sub-overlay to be called. Vertical positioning of elements in the sub-overlay is added to this value. |
|
- |
The sub-overlay is re-positioned upwards relative to the position of the string matching the criteria for the sub-overlay to be called. Vertical positioning of elements in the sub-overlay is added to this value. |
Left edge:
Inches, pels position according to the entry of the following field:
A |
Horizontal position of the sub-overlay is made absolute to the left edge of the paper. Horizontal positioning of elements in the sub-overlay is added to this value. |
|
+ |
The sub-overlay is re-positioned to the right relative to the position of the string matching the criteria for the sub-overlay to be called. Horizontal positioning of elements in the sub-overlay is added to this value. |
|
- |
The sub-overlay is re-positioned to the left relative to the position of the string matching the criteria for the sub-overlay to be called. Horizontal positioning of elements in the sub-overlay is added to this value. |
Blank After:
Stating B will remove the text string or the number, which has been used for the condition, from the resulting print out. Remember, that if you use ‘B’ any subsequent conditioned overlays may be called, if they are conditioned by blanks in these positions. A better alternative is to use a tabulator to remove the spooled file data - either inside the conditioned overlay or in the main overlay or both.
If you state a Y here, then you can use up to 4 conditions to check if the other overlay should be called. All conditions refer to the same spooled file line. With the condition below the conditioned overlay will only be called if the text found in line 13 position 57 is larger than 1000 and also smaller than 1004: (The window below will pop up if you set a Y for this field).
Conditions Input line 13 - 13 AND/OR Positions Test Compare value 57 - 60 > 1000 AND 57 - 60 < 1004 - - Test: > greater than, = equal, < less than, N not egual, A accepted characters, U unaccepted characters F12=Cancel
|
WARNING: Global settings of the sub-overlay, inserted by the if..then line, will be ignored as well as 6 = Print-info.
WARNING: Up to 300 ‘If..Then’ lines can be defined for an overlay.
WARNING: Only one level of conditioned sub-overlays is possible.’If..Then’ lines placed in overlays, which are called by ‘If..Then’ are never executed.
WARNING: Totally blank lines are not considered for the If..Then line i.e. a condition on one or more blank characters on a totally blank line will not trigger a call of the suboverlay. The OS/400 command DSPSPLF will show the lines which can be conditioned.
F=PCL-FILE
Insertion of a PCL-file should be avoided if at all possible. The PCL file as a design resource is not displayed in the designer and can only be used for PCL output - not for PDF, ZPL nor IPL.
The only situation where a PCL file could be considered is, if you have an image with grey tones, that does not look good as a sharp black/white TIFF image. If in such a situation you could also consider to create a color output even if the printer is only black/white as many black/white printers are able to convert the color data stream into a nice black and white output. Help to generate and use a PCL file can be found here and in the cookbook: http://download.interform400.com/shares/public/CookBook.zip
Seqnbr. Type Inch.pel 1.0 F PCL-file From top edge _______ (+ -) From left _______ (+ -) File name __________
|
The overlay element that defines the PCL file to be inserted is quite simple. It is, however, possible to fine adjust the placement of the PCL form compared to the positions defined in the original PCL-file.
From top edge Inches, pels vertical position of the PCL file is made absolute to the upper edge of the paper. Vertical positioning of elements in the PCL file is added to this value. Adding a minus after the value, will cause an movement upwards. (e.g. 1,120- for 1½” negative movement)
From left edge Inches, pels horizontal position of the PCL file is made absolute to the left edge of the paper. Horizontal positioning of elements in the PCL file is added to this value. Adding a minus after the value, will cause a movement to the left. (e.g. 1,120- for 1½”movement to the left)
Color printing:
When working in a file-set defined for color printing the PCL-file settings will have an additional definition for color PCL-files. The Black/White PCL-file definition is available to facilitate printing of the same overlay both on black and white and color laser printers.
WARNING: The system does not check the contents of the PCL file to be PCL5 or PCL5e code. It is recommended to use an HP4/HP5 or a generic/Universal PCL5e driver to create the PCL files on the PC.
B=Text block
This function is available in PCL/PDF file sets only - not for label file sets.
If you want to insert many lines of fixed texts e.g. for a duplex back page overlay, then you should consider this text block element. With this element you can copy and paste multi-line texts from another document and decide to either let Interform400 change lines when needed or force line breaks, when you want them.
Not only this, but the block function includes the functionality of the extended remap window to dynamically change between e.g. fonts and colors.
To insert a text block you insert a type B=Text block element in your overlay:
Seqnbr. Type Inch.pel 1.0 B Text block From top edge 1.000 From left 1.000 Line spacing . . 40 Rotation 000 Font 5012
|
On the first screen above you specify this:
From top edge
The position from the top edge of the paper where this text block element should be placed.
From left edge
The position from the top edge of the paper where this text block element should be placed.
Rotation
Rotation of the text block relative to the overlay in which it is placed.
Font
The default font to use for the specified text. Another font can be triggered dynamically in the text.
Line spacing
The line height of the text, if multiple text lines are generated.
The height of a line measured in pels. (40 pels equals 1/6 of an inch or 6 Lines Per Inch. InterForm400 can help you to convert measurements if needed.).
When you press Enter the next configuration screen is shown:
Block formatting using escape sequences
Maximum line width . . . . . 5,000 Inches.pels, 0=No wrap Right margin adjust . . . . 100 0-100% Escape sequences: Start underline . . . . . ESC sequence End underline . . . . . . ESC sequence Conditional hyphen . . . . ESC sequence New line . . . . . . . . . ^NL ESC sequence Half line up . . . . . . . ^LU ESC sequence Half line down . . . . . . ESC sequence End half line up/down . . ^NM ESC sequence Reset font . . . . . . . . ESC sequence Font changes: ^F1 5006 ^F2 5008 ^F3 5010 ESC sequence ^F4 5011 ^F5 5012 ^F6 5013 followed by ^F7 5014 ^F8 5015 ^F9 5016 font number Color changes: ^C1 001 ^C2 002 ^C3 003 ESC sequence ^C4 004 ^C5 005 ^C6 006 followed by F3=Exit F4=List F12=Cancel color number
|
On the screen above you define the width of the output text and various, optional triggers for font and color changes exactly as for the remap window with extended adjustment. All of this is explained here and here.
When you press Enter an editor for the text is shown:
Update text block BLO410D Start with . . . . . . . . :
001 The weight of our ^C5blue^C1 earth is 5.9722 x 10^LU24^NM kilograms^NL 002 ^F3 003 This is just a very, very, very, very, very , very, very, very, very, 004 very, very, very, very, very, very, very, very, very, very, very, very 005 looooong text 006 007 008 009 010 011 012 013 014 015 016
F5=Split up line at cursor F6=Delete lines F7=Move lines F8=Insert blank lines F9=Copy lines F3=Exit F12=Cancel
|
Remember to press Enter whenever you have made any changes to the text before pressing a function key. Enter will save your current changes.
It is possible to copy a multi-line text from another document, but you need to verify if a word has been divided, after pasting into the screen above.
The width of the entry lines is 72 characters, so at best you should make sure, that your text does not exceed 72 characters in the width before pasting into the editor.
In this way you can be sure, that words are not divided during the paste.
After updating the text and pressing Enter twice you can press F14 to preview the result of the text block. The definitions above results in this:

The editor has these features:
F5=Split up line at cursor
Use this function key, if you want to insert text in the middle of a line. If you press this, then text to the right of the current position of the cursor is moved to the next line, which creates space for the additional text.
F6=Delete lines
Press this key to delete an interval of lines of texts in the editor.
F7=Move lines
F7 is able to move an interval of text lines to another sequence line.
F8=Insert blank lines
Press this function key to insert blank lines. You are prompted for where to insert the lines and how many lines to insert.
S=SUBOVERLAY
If you are printing general company info in several overlays, i.e. the company letter head, it is convenient to place this info in a separate overlay. With this function you can place such information in an overlay that can be called as a sub-overlay from any other overlays. Ie. changing e.g. the phone number only have to do be done in this overlay.
Design InterForm 400 overlay APF300D
Overlay name: Invoice Overlay text: Invoice overlay
Seqnbr. Type Overlay definition
Seqnbr. Type 1,0 S Suboverlay
Overlay name HEADER
F3=Exit F12=Cancel
|
The name of the overlay to be used as sub-overlay. If the name entered here is MACROxxxxx where xxxxx represents a numeric number (e.g. MACRO00001) InterForm400® will make a PCL macro call using this number. This will require the PCL macro to be loaded into the printer prior to using the main overlay. The PCL file can be loaded into the printer by the InterForm400 HPMACRO command.
WARNING: Global settings of the sub-overlay, inserted by the S=Suboverlay, will be ignored as well as 6 = Print-info.
C = Concat
This element works like a normal text element except that it is able to concat multiple texts from the spooled file with multiple fixed texts. This can e.g. be interesting if you want to concat multiple fields from the spooled file and combine them into a barcode. The element is defined like this:
Seqnbr. Type Inch.pel 1,0 C Concat field From top edge 0,120 From left 1,000 Rotation 000 Font 4400 F4=List Condition: Line - Position - Is > = < N A U More conditions N (Y N)
|
When you press Enter you will see the list of the subsequence numbers defined for this concat element. If you enter a number you either create a new subsequence number or edit the existing:
Update Concat Subfields APF311D
Sequence number . . . : 0001
1 Partnumber 2 Customer Name 3 Contact Person
Subseq. 1,0 Suspend *=Suspend Description Partnumber Required field *YES *YES, *NO, *ALWBLK Prefix [)>^1E06^1DP Length Suffix Length Where found *MAIN *MAIN, *SUB Input line 13 - 13 Position 57 - 60 Trim *YES *NO, *YES, *LEFT, *RIGHT, *LZERO Condition: Position - Is > = < N A U More conditions N (Y N) F3=Exit F11=Delete F12=Cancel F18=DSPSPLF F19=DSPPFM
|
(If you are not editing a subsequence number you can press F5 to rearrange the subsequence list).
The screen shot above indicates how you can use the concat combined with a PDF417 barcode definition to insert the special, unprintable ASCII characters required for e.g. the GM 1724 transport label. (The ‘^’ is here defined as the hex byte prefix in the PDF417 barcode.). Refer to the 2D barcode definitions for additional information.
The fields on the screen are these:
Suspend
Suspend/deactivate the subsequence number.
Description
For your internal use/documentation. This is not included in the final output.
Required field
The field can be found by scanning the spooled file for a trigger text in the same line.
If you set this to *YES and a true condition is not found (or the input data from the spooled file is blank), then the complete concat element is ignored, and not inserted in the merged result.
If set to *NO the specific concat detail will not be inserted (in case of an invalid condition or blank input text), but the concat element itself will still be generated.
If set to *ALWBLK (short for Allow Blank), the concat detail line (and especially the prefix and suffix) will be inserted - even if the spooled file data is blank. This can be used for building up a longer text combined by (dummy) detail lines to be used in e.g. a long link in a QR barcode.
Prefix
A fixed text to precede the variable text from the spooled file. If you set a length, that is longer than the length of the fixed text, then the text will be padded with blanks prior to the spooled file data.
Suffix
Like Prefix above - except this is a fixed text added after the variable spooled file data.
Where found
The line numbers can either be the absolute spooled file number as seen by the main overlay (*MAIN) or the relative line number if the concat element is inserted in a conditioned overlay (*SUB). A conditioned overlay always counts the spooled file line number from the spooled file line, that triggered the conditioned overlay - so if e.g. triggered by a condition in line 43, then line 43 is known in the conditioned overlay as line 1.
Trim
The trim option tell InterForm400 what to do with leading and trailing blanks of the positions, that are picked from the spooled files. The possible values are:
*NO |
All blanks selected are included in the result. |
|
*YES |
All leading and trailing blanks are removed in the result. |
|
*LEFT |
All leading blanks are removed. |
|
*RIGHT |
All trailing blanks are removed. |
|
*LZERO |
All leading and trailing blanks are substituted for leading zeroes. |
Line
The line or lines from where the spooled file data is be searched or just copied like above.
Position
The spooled file positions to include in the concat subsequence number.
Condition
Refer to the If..then element for information of how conditions works.
* = COMMENT
This function will insert a comment in your overlay definition. Introducing a comment line in the overlay definition is for easy overview purposes only and will not affect the resulting print.
Seqnbr. Type Overlay definition 0001 * Insert InterForm Logo in Upper Right Corner 0002 I Image DEMOIMAGE Top 01.100 Left 04.180 0003 * Recepient Frame 0004 1 Frame top 01.100 left 00.200 right 04.120 bottom 02.160 0005 * Remap Recepient Adress into Recepient frame 0006 9 Remap window 06-011 pos 08-040 top 1.160 left 1.000 L
Seqnbr. Type 1.0 * Comment
Insert InterForm Logo in Upper Right Corner
|