Here are some tips, that can help you when you make your template designs:
1.Introduction to the designer
4.Use a grid for aligment.
5.Preview of the merged result.
6.Introduction to fixed and dynamic positions.
7.Fixed positioned elements in details.
8.Dynamic positioned elements in details.
9.When and how to combine fixed and dynamic positioning
10.How to handle overlapping elements in the designer.
11.The options for handling detail lines
12.There are several template examples as mentioned below:
13.Template: Header, footer and body area
14.Template Large header on page 1 only
15.Template: Make room for total on last page.
16.Which template element caused an error while rendering.
17.Scripting/setup of dynamic settings of design elements via an xpath expression.
19.How to solve the error: "Required cardinality of first argument of <function()> is zero or one; supplied value contains <x> items".
20.Dynamic switch between normal/bold in the middle of a text
21.How to copy data from the sample input file e.g. for a condition in the designer and workflow.
22.How to insert multiple horizontal lines with a repeat.
23.How to insert multiple vertical lines with a repeat.
24.How to output multiple collated copies
25.How to output multiple uncollated copies
26.Edit a sample file in the designer
Suspend design elements
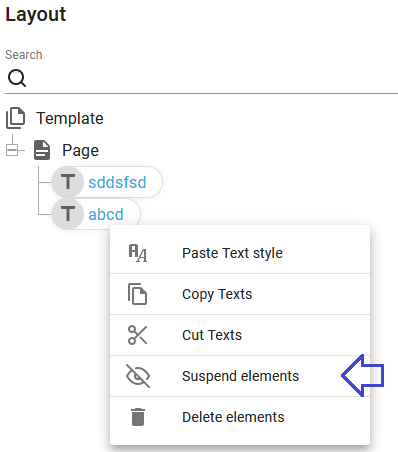
You can choose to suspend one or multiple design elements, when you are working in the designer. If you want to suspend multiple elements, then you first select all the elements e.g. by holding down the <SHIFT> key and left click with the mouse on the first and last element or hold <CTRL> and left click with the mouse on the individual elements, that you want to select. Then you right click on one of the selected elements and here you can then select the Suspend element option:
How to copy data from the sample input file e.g. for a condition in the designer and workflow
If you e.g. want to insert a comparison in either the designer or the workflow, then you might want to compare the contents with a value, that you want to copy into the clipboard instead of typing the compare value manually.
You can do that by marking the text in the input XML or spooled file and simply press <CTRL> + C and then paste the value in the editor e.g. with the short cut <CTRL> + V.
How to output multiple collated copies
With InterFormNG2 you can setup a template to output multiple collated copies. Collated copies can be described in the way, that if you output a 2 page output 3 times, then the collated output will be page 1, 2, then page 1, 2 and again page 1, 2.
This can be solved in either of these ways:
1. Collated copies with the workflow
2. Collated copies in the template
1. Collated copies with the workflow
The advantages creating collated copies with the workflow are, that you do not need to do any changes in the template and that the current page number and the total number of pages can directly be output with the built-in functions, ng:page-number and ng:last-page-number. A limitation with this is, that the multiple copies are separate documents, which might not be what you want.
You can create collated copies by using the workflow component, repeat and here do the merge 3 times like below:

The output could be print like above or e.g. PDF with the component, Create PDF file.
With the setup above the copies will be identical, but perhaps you want a reference to the exact copy e.g.:
'Original', 'Internal copy' and 'Customer copy'.
In order to make each copy a bit different we need to introduce a workflow variable and increment the variable for each iteration:

After the input element we define the new variable, CopyNbr with the initial value 1:
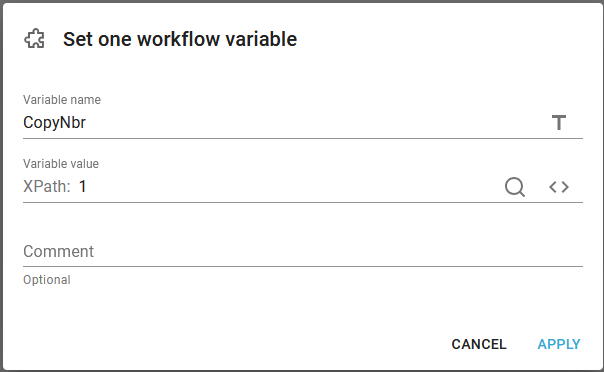
Then the repeat is run:
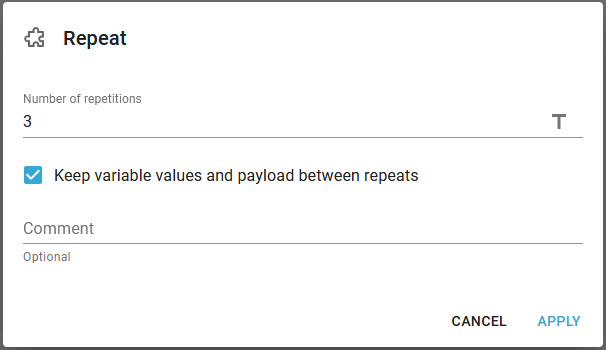
Please note, that we keep the variable value and the payload for all the repeats. That is necessary in order to use the variable and increment it for each iteration.
Inside the repeat we now print one document (we could also here have generated an email or a PDF of course):
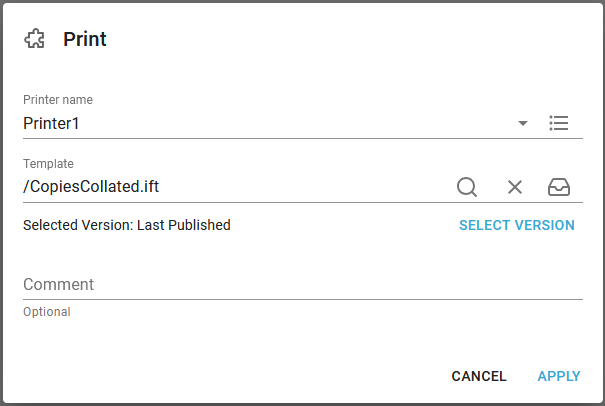
And finally we increment the variable for each iteration:
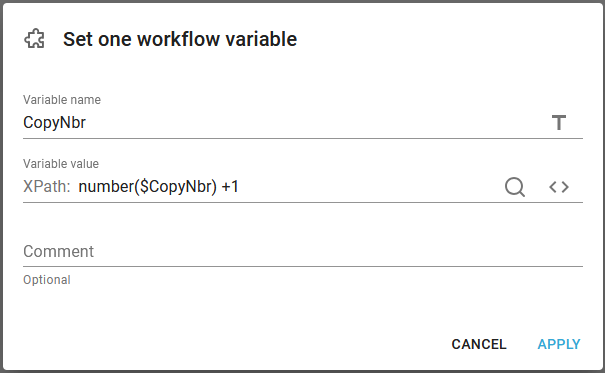
Here we need the function, number() in order to specify, that the variable, CopyNbr should be converted into a number, which is necessary in order to add 1.
The only thing missing is the logics inside the template to include different texts depending on the current value of the CopyNbr variable. That is not a problem as the workflow and template share variables.
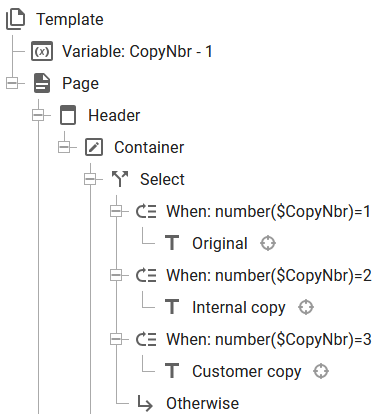
In the template (CopiesCollated.ift) we can use the workflow variable, CopyNbr like below:
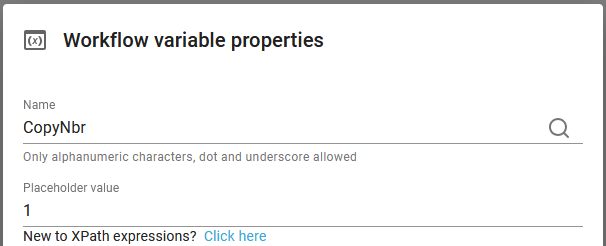
As the first element in the template we use the workflow variable element as a placeholder in the template to indicate, that we expect the workflow to define this variable. The variable is set to the value: 1, but this only has effect in the designer and not when the template is run in the workflow. This is the workflow variable element used:
Inside the header we use a select element to output a special text, which depends on the current value of the workflow variable, CopyNbr. In the branches of the select element we use the function, number() to convert the workflow variable (which is a string) into a number, which is needed in order to compare with a number, which we do in this case.
2. Collated copies in the template
The example above shows how to create multiple collated copies with a workflow. This generates separate documents and it might be, that you instead need all of the copies to be included in the same document. If so, then you can consider to create all of the copies in the template. The example below also refers to a document, that is to be repeated 3 times.
In order to get these 3 copies you can setup your template in this way:
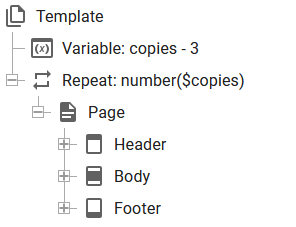
In the example above we expect the workflow to setup a workflow variable, copies which contains the number of copies. The workflow variable is considered a string, so we use the function number() to convert the string into a number for the repeat.
But then you see the wrong page number if you use either of the built-in functions: ng:page-number and ng:last-page-number to print out the current page number and the total number of pages:
The function, ng:page-number outputs the current page number which in this case would be 1,2,3,4,5,6, where you would actually need 1,2,1,2,1,2. The function ng:last-page-number outputs the total number of pages, which actually is 6 and not 2, which is the number of pages of a single document.
For the current page number (ng:page-number) you can instead implement a new variable, which you reset for each document and increment yourself for each page e.g. like below:
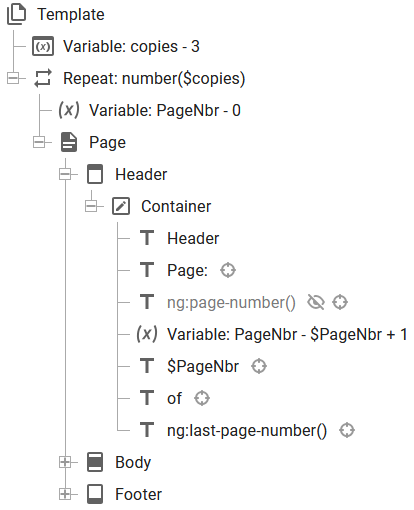
In the template above we have added a new variable, PageNbr, which is set to 0 before a new document is rendered. In the header the use of ng:page-number() is suspended and instead the value of the variable, PageNbr is first incremented with 1 and then output on each page. We have suspended the ng:page-number() function.
The total number of pages is another problem, which is not as easily solved. If the input file is a spooled file, then you can use the total number of pages of the input spooled file, but if the input file is an XML file with a variable number of detail lines, then it gets more difficult.. You cannot use the built in function ng:last-page-number and then divide this number with 3 as the value for the function ng:last-page-number() is inserted as a text after all output has been rendered.
If you are lucky, then the number of output pages for a document is predicable meaning, that you can be sure how much space each detail lines takes up and how much space the total section of a document takes up and in that way calculate the total number of pages, but that is normally a challenge..
How to output multiple uncollated copies
This section describes how multiple uncollated copies can be output in InterFormNG2. Uncollated means, that the output is generated in the sequence: Page 1 of a document is printed multiple times, then page 2 is printed multiple times etc.
Outputting multiple uncollated copies is the easiest, if the page breaks a predictable, so that a repeat loop and trigger the multiple copies of each page. That is easiest if the input file is a spooled file and a fixed number of input pages are mapped to each output page. This is covered in the section, Copy management for spooled files.
It can be a challenge to predict the page breaks for documents where the input file is an XML file, but that is what is needed if you want to create uncollated copies. Here you will need to break up the repeat of the detail lines into fractions, that you are sure that fits into a single output page.
Below is an example where this done.
As the input we have here an XML file with contents like this:
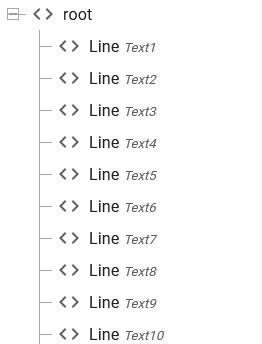
We want 3 copies of each page, and there is room for 6 detail lines on each page.
Such a setup can be done with a template like below:
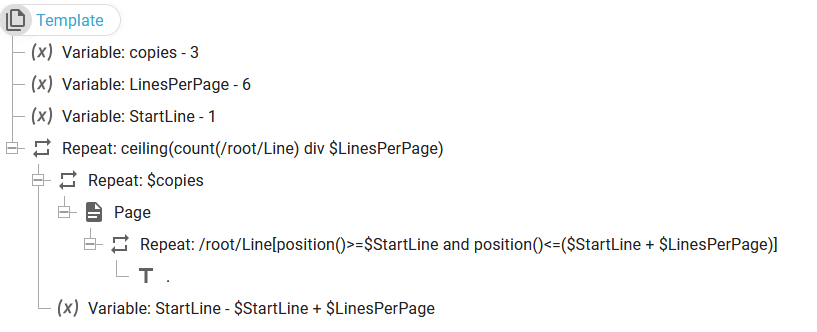
Each of the elements are described below:
1. Variable, copies=3
Here we define how many copies of each page we want. Here we want to output page 1 three times and then page 2 three times etc.
2. Variable, LinesPerPage=6
Here we define how many detail lines we can have on each page. So the value 6 means, that we will output 6 detail lines on each page.
3. Variable, StartLine=1
This variable is used in the detail line repeat loop and it stores the index of the first line number that is to be printed on the current page. The start value is 1 as the first output page of course will start with the first line node.
4. Repeat: ceiling(count(/root/Line) div $LinesPerPage)
The expression inside the repeat calculates the expected number of output pages. The expression: count(/root/Line) count the number of detail lines in the xml file above. This is then divided by the number of detail lines per page ($LinesPerPage) and rounded up to a whole number of pages with the ceiling() function.
5. Repeat: $copies
This makes InterFormNG2 repeat the current page as many times as is specified in the variable, copies.
6. Page
This is of course the output page.
7. Repeat: /root/Line[position()>=$StartLine and position()<=($StartLine + $LinesPerPage)]
This does a repeat for a sub-section of all the Line nodes. It iterates across the Line nodes, which has a position (from the top of the XML file) which is larger or equal to the StartLine and less or equal to the StartLine plus the number of lines per page. On the first page it will with the settings above iterate through the 6 first Line nodes.
8. Text: .
This is simply a text element which has the Xpath expression: ".". The text element could also have been defined as the Xpath expression: text(), which outputs the value of the current node.
The final touch might be, that you want different texts on the 3 identical copies and that is possible by introducing another variable to keep track of the current copy number like below:
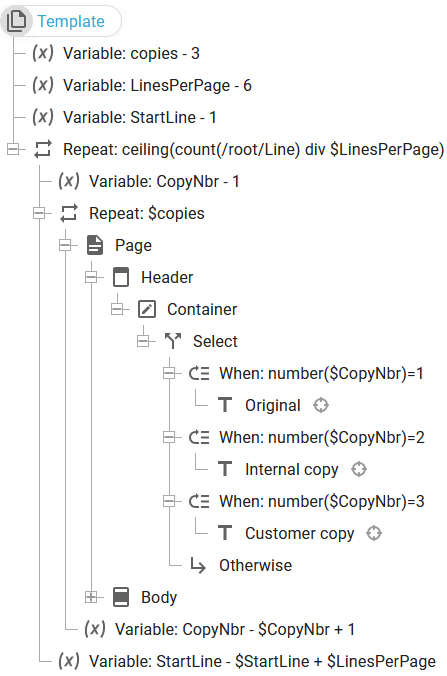
In the template above we have introduced the variable, CopyNbr, which starts with the value 1, whenever we start on a new page. This variable is incremented with 1 for each copy (CopyNbr=$CopyNbr + 1) and in the header of the page there is a select element, which selects a specific text for each copy.
Edit a sample file in the designer
It is possible to edit a file in the Library, but it is also possible to edit the contents of a sample input file directly in the designer. You can do that as shown below:
You will see this after you have loaded a sample file in the designer:
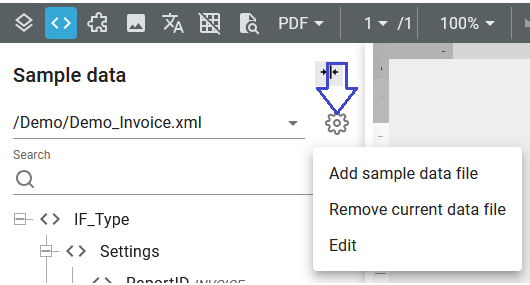
In the screen shot above we have clicked the marked settings icon, which shows the available options. If you here select Edit a pop-up window with the file editor will open.